
User guide


6
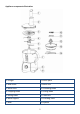
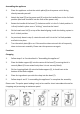
Assembling the appliance
1. Place the appliance so that the switch plate (8) on the power unit is facing
directly towards yourself.
2. Aach the bowl (7) to the power unit (9) so that the handle faces in the 2 o’clock
posion (the bowl should t into the slots of the power unit).
3. Rotate the handle of the bowl (7) clockwise unl it is in the 3 o’clock posion. It
is rmly locked in place once a “clicking” sound can be heard.
4. Fit the bowl cover lid (2) on top of the bowl aligning it with the locking system in
the 2 o’clock posion.
5. As previously done in step 3, rotate the unit unl it is at the 3 o’clock posion
and locks into place.
6. Turn the switch plate (8) to on. If the machine does not work this is frequently
down to incorrect assembly. Please start the process over again.
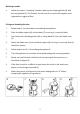
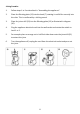
Funcons
Chopping
1. Follow steps 1 to 3 as described in “Assembling the appliance”.
2. Place the blade support (6) into the centre of the bowl (7) ensuring that it is
securely ed (if it can rotate freely then it is not securely ed).
3. Fit the chopping blade (4) onto the blade support (6), it should rest at the
boom of the blade support.
4. Place the ingredients you wish the chop into the bowl (7).
5. Follow steps 4 and 5 “in assembling the appliance” to complete the assembly.
Please note: The pulse speed seng is only to be used for short intermient bursts for
chopping and processing at maximum speed.