90 Day pet feeder Please read the manual carefully and keep the instructions for future reference.
Contents Control Panel Page 3 Features Page 3 Assembly and Disassembly Page 4 Getting Started Page 5 General Operation Page 6 Reviewing the settings Page 8 Feed Times Page 9 Voice Recording Page 9 Feeding Alarm Page 10 Opening the feed cover Page 11 Cleaning and Care Page 11 FAQs Page 12 Guarantee Page 13 Contact Details Page 14 2
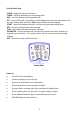
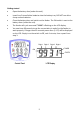
Control Panel Keys CLOCK –displays clock (current time). TIMER – switches between pre-set feeding times. VOL – sets the feeding volume/portion-size. SET – enters SET mode, and confirms any feeding times you enter and advances to the next setting. Also used with VOL key to perform manual feedings. START – starts the feeding schedule, confirms the clock and feeding-time. REC – records your personal voice message. PLAY – plays back your personal voice message. ON SWITCH – turns the feeder off.
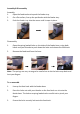
Assembly & Disassembly Assembly 1. Open the food tank and unpack the feeder tray. 2. On a flat surface, line up the pet feeder with the feeder tray. 3. Push the feeder tray into the recess until it snaps in place. Disassembly 1. Open the spring loaded locks on the sides of the feeder base, using both hands and your thumbs to push down the locks and release the food tank. 2. Remove the food tank from the base.
Getting started Open the battery door (under the unit). Insert four D-size alkaline batteries into the battery tray. DO NOT use old or cheap carbon batteries. Close the battery door and switch on the feeder. The ON switch is next to the battery door (under the unit). The feeder will cycle once until ”12:00” is flashing on the LCD display. You now have 90 seconds to set the current time in order for the feeder to work properly.
General operation Setting the Current Time 1. All digits should now be flashing. 2. Press the CLOCK key to set the HOUR. 3. Press the TIMER key to set the MINUTE. 4. Press the SET key once to confirm the time, now the display will show either 12 or 24 to indicate the display mode. 5. Press the CLOCK key to change between 12 or 24-hour display mode. 6. Press the START key to CONFIRM the clock setup. 7. (1 :07) will be flashing and you must now set the feeding times.
Note: If all four feeding-times have been set, the process will terminate and the schedule will start automatically. The next feeding time will then be displayed. (If only 1 feeding-time has been set then the feeding-timer display will not change even if you press the TIMER key.) Feeding-times must be set in ascending order otherwise the remaining number of the feeds will not be served. Setting the Volume/Portion-Size 1. Press the VOL key to display feed-volume/portion-size. 2.
To review the settings 1. Press the TIMER key to cycle through and view the feeding times. Only the feeding times per day that are set will be displayed. Digit-1 is the feeding number each day, Digit 3 & 4 are the feeding times (in hours). Example: (1 07)=(1st feeding at 7am). 2. Press the VOL key once to view the volume/portion-size and feeding day (s) remaining. 3. Press the DAY key to display feeding day(s) remaining. 4.
Setting the Number of Days to Feed 1. Press the DAY key and the left side of the LCD shows the number of days your Automatic Feeder will feed for until it stops. The default setting of (0) means the feeder will feed continuously and never stop. 2. To change the number of days to feed, press the DAY key then press and hold the SET key (for 2 seconds) until the days flash on the LCD. 3. Press the DAY key to change the number of days. Hold down the DAY key to speed through the numbers. 4.
Feeding Alarm 1. Your Automatic Pet Feeder has an ALARM (a continuous beeping) to alert you to when your feeding schedule has ended and no more food will be dispensed. 2. The Feeding Alarm will start at 6:00AM the next day to avoid disturbing anyone during the night. 3. You can press any key to stop the alarm. 4. To restart your original feeding schedule, press the START key.
Opening and closing the food cover 1. 2. To open ( Unlock ) the food cover Automatic Pet Feeder, rotate the round dial so the ARROW points towards the Open Lock. To close ( Lock ) the food cover Automatic Pet Feeder, rotate the round dial so the ARROW points towards the Closed Lock. Care and cleaning When the food tank starts getting dirty and there is a lot of loose food at the bottom of the food tank, you can remove the food cover and food tank for cleaning.
FAQ’S 1. The clock can display in either 12 or 24-hour display format The ( PM ) icon will show in the afternoon under the 12-hour display mode. 2. The feeding days can be changed at any time but the previous schedule will be replaced and will start from the 1st new feeding day set. 3. The feeding times and feeding-volume can be changed at any time and the new settings will be for the rest of the feeding day/s schedule. 4.
UK and EU Guarantee Your new Andrew James product comes with a 24 month guarantee and a 2 year fixed warranty, effective from receipt confirmation. Your receipt or order number is required as proof of purchase date so it is imperative that you keep it safe. This guarantee only applies if the item has been used solely for the use intended, and all instructions have been followed accordingly. Please note this product is only for domestic not commercial use. Abuse of your product will invalidate the guarantee.