Apple Peeler and Slicer Please read the manual fully before using the appliance and keep the manual safe for future reference.
Contents page Appliance components Page 3 Getting to know the appliance Page 4 Peeling, Coring and Slicing Page 4 Peeling only Page 6 Slicing and Coring only Page 6 Adjusting the blades Page 7 UK and EU Guarantee Page 8 Contact details Page 8 2
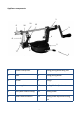
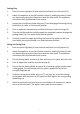
Appliance components 2 11 9 10 12 2 3 4 8 5 7 6 1 1. Suction clamp lever 7. Coring/slicing blade wing nut 2. Shaft 8. Coring/slicing blade 3. Handle 9. Prongs 4. Screw regulator 10. Peeling blade adjustment screw 5. Base (with suction clamp) 11. Peeling blade 6. Peeler blade armature 12.
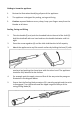
Getting to know the appliance 1. Review the illustration identifying all parts of the appliance. 2. The appliance is designed for peeling, coring and slicing. 3. Caution: exposed blades are very sharp, keep your fingers away from the blender at all times. Peeling, Coring and Slicing 1. Take the handle (3) and push the threaded hole to the end of the shaft (2). Hold the shaft still with one hand and turn the handle clockwise until it is tight 2.
6. Undo the coring/slicing blade wing nut (7) and align the eye of the coring/ slicing blade with the centre of the apple and then tighten the coring/slicing blade wing nut. 7. Turn the handle in a clockwise fashion until the apple is completely sliced and cored. 8. Carefully pull the apple from the prongs whilst holding the shaft with the other hand. Turn the handle anti-clockwise to release the core from the shaft.
Peeling Only 1. Press the screw regulator (4) and slide the shaft back to its full extent (2). 2. Attach the appliance to any flat smooth surface by holding the base (5) with one hand and pushing the clamp lever with the other hand. The appliance should then be fully attached to the surface. 3. Loosen the coring/slicing blade wing nut (7) and disengage the coring/slicing blade (8) so it is now in a horizontal position. 4. Push an apple for example stem end first all the way onto the prongs (9). 5.
Adjusting The Blades 1. To adjust the minimum fruit diameter, use a screwdriver to turn the adjustment screw (10) clockwise or counter clockwise until the desired distance is achieved. 2. To adjust the peeling depth, loosen the peeling blade wing nut (12) and adjust the peeling blade (11) to the desired depth then fasten the peeling blade wing nut. UK and EU Guarantee Your new Andrew James product comes with a 24 month guarantee and a 2 year fixed warranty, effective from receipt confirmation.
The guarantee does not cover any defect arising from improper use, damage, buildup of lime scale or repair attempts made by third-parties. Also, the guarantee does not cover normal wear and tear of individual parts.