
Instruction manual


13
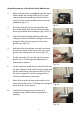
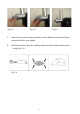
Assembling the sausage aachment
1. Insert the meat grinder case (2) into the inlet in the
Mulfunconal Food Mixer. Turn and lock into
place. (g. 4.1)
2. Place the roller (3) into the meat grinder case. (g.
4.2)
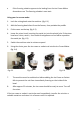
3. Place the blade (4) onto the roller followed by the
sausage holder (5) and sausage tube (7). (g. 4.3, 4.4,
4.5)
4. Hold the sausage holder (5) and sausage tube (7) into
place, slide the nut over and ghten unl the
aachments are rmly secured. (g. 4.6)
5. Slide the sausage skin over the sausage tube.
6. Feed ingredients into the meat dish (1) by using the
tamper only.
7. Turn the Mixer on. Allow the meat to move to the
end of the sausage aachment then turn the
Mul-funconal Food Mixer o. Pull the skin over
the end of the sausage aachment and e a knot in
the end of the skin. This way, the meat will not fall
out of the sausage skin.
8. Restart the mixer. Guide the sausages slowly o the
sausage tube, whilst pushing the meat on the meat
dish with the food pusher.
9. You should stop the machine when the sausage skin
is lled with meat. If there are any air bubbles in the
sausage, you can let the air out with a needle. Then
repeat steps 7-9 again unl nished.
10. Tie and cut any excess skin. Twist sausages to the
desired length.
11. Leave the sausages in links overnight in the
refrigerator, for best results.
Fig. 4.1
Fig. 4.2
Fig. 4.3
Fig. 4.4
Fig. 4.5
Fig. 4.6