
Installation Guide


6
INSTALL
LATCH RAIL
AND REMOVE
PROTECTIVE FILM
(Left Hand)
5
G
1/8”
!
!
1/2”
1/2”
1/2”
1”
1 1/2”
2”
1 1/2”
5/8”
5/8”
1”
x 3
x 2
x 6
Pad
1/8” Plug
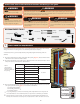
Tools needed:
YELLOW BAG / BOLSA AMARILLA / SAC JAUNE
b
a
G
1/8” PLUG
TAPÒN DE 0.32 CM
BOUCHON PEINT 3,2 MM
PAD
ALMOHADILLA
TAMPON
!
!
1/2”
1/2”
1/2”
1”
1 1/2”
2”
1 1/2”
5/8”
5/8”
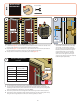
Window
Handle
R
INSTALL
WINDOW
HANDLE
(Left Hand)
INSTALL
HANDLE
SET
(Left Hand)
76
X
X
X
X
X
X
X
X
X
X
XX
VIEW
X
X
X
X
X
X
X
X
X
X
XX
VIEW
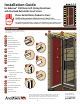
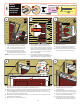
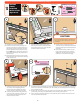
1.
Find the three 1/2” square adhesive backed
spacer pads in yellow bag in installation kit.
2. Swing door open and wipe o any residue
on edge of door.
3. Peel paper backer o each pad and attach
them to latch side door edge. Position one
approximately 6” down from top of door,
another close to center of door, and the
third approximately 6” up from bottom.
1. Place latch rail (G) in opening with top end pushed up
against rain cap.
2. Close storm door and slide latch rail towards door frame
until it contacts all three spacer pads, creating 3/16” gap.
3. Using drill bit and 1” screws from yellow bag, fasten latch rail
to mounting surface.
4. Open storm door, remove spacer pads, then properly discard.
5. Use the 1/8” plugs from yellow bag to plug the unused holes
on handle side edge of door frame.
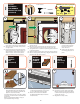
1. Lower or raise the ventilating glass panel
so that the holes below the insect screen
are at a comfortable working height.
2. Refer to the instructions included in
the Window Handle Kit (R) to install the
window handle.
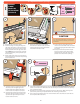
1. Remove all remaining
protective lm from both
the interior and exterior
sides of the door.
2. Remove any tape holding
the venting glass panel in
place.
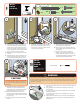
1. Close the storm door.
2. From interior, loosen sweep screws with
Phillips screw driver. Adjust sweep (H) up
or down until sweep n lightly comes into
contact with door sill.
3. Retighten the sweep screws.
H
aa
i
i
i
i
VIEW
BOTTOM
PARTE INFERIOR
BAS
i
i
VIEW
a
ADJUST
SWEEP
(Left Hand)
(If necessary)
8
Tools needed:
!
!
1/2”
1/2”
1/2”
1”
1 1/2”
2”
1 1/2”
5/8”
5/8”
M
#8
#10
#12
#6
3/4” Machine Pan Painted
1/2” SMS Pan
1/2” SMS Pan Painted
1/2” SMS Flathead
1/2” Self-Drill Pan
1/2” Self-Drill Pan Painted
3/4” Machine Flathead
7/8” Machine Pan Painted
1” SMS Pan
1” SMS Pan Painted
1” Machine Pan Painted
1-1/2” Machine Flathead
1-1/2” Machine Flathead
2” SMS Pan Painted
5/8” SMS Pan Painted
1-1/4” SMS Pan
i
i
i
VIEW
a
N
Q
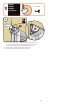
1. Refer to the instructions included in Cover
Plate and Drill Kit (Q) to drill handle holes,
and refer to the instructions in Handle Set
(N) box to install door handles.
You can match your Andersen storm door lock to Schlage® or Kwikset®
entry door locks. See handle set instructions contained within handle
set box for details.
“Kwikset” is a registered trademark of Newfry LLC. “Schlage” is a
registered trademark of Schlage Lock Company.
c