
Installation Guide


12
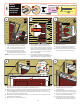
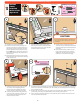
INSTALL
CLOSER
(Right Hand)
18
a
1. Position the base from the installation kit
onto the door jamb by touching the front
of the base to the back of the hinge rail (or
as close as possible), and align the bottom
of the base with the top of the sweep. Mark
the hole locations on the door jamb.
2. Drill holes in the door jamb at the marked
locations.
3. Attach the base to the door jamb with two
2” screws from the green bag into the two
holes closest to the interior of the house.
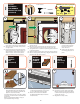
1. The following parts will be found in the
installation kit.
2. Pin the closer in place using the short pin
in the jamb bracket and the long pin in the
door bracket.
3. Pull on the closer so the rod extends
slightly. Snap the orange preload clip
from the green bag over the rod. The clip
should be pinched tight between the closer
cylinder body and the jamb bracket.
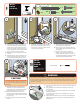
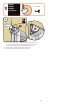
1. Open the door and then let it close. Note the speed at which the
door closes.
2. Using a Phillips head screwdriver to adjust the closer to the
desired speed:
For a faster closing speed, turn the adjustment screw to the left
(counterclockwise).
For a slower closing speed, turn the adjustment screw to the
right (clockwise).
3. Test the speed at which the door closes after each adjustment.
Adjust the screw more, if needed, to achieve the desired door
closing speed.
1. Attach the arm from the installation kit to
the base by inserting the tabs on the arm
into the slots in the base. Fasten with a 2”
screw from the green bag.
a
b
c
Do not drill completely through door. This will create an
unnecessary hole in the door and may cause water and
air inltration.
CAUTION
d
ADJUST
CLOSING
SPEED OF
DOOR
Closer and door shown
are for reference only.
19
Tools needed:
Storm door will close more quickly when entry door is open. To achieve the proper closing speed, you will need to adjust
the closer(s) using the built-in adjustment screw. Check for safe closing speed with your entry door in both the closed and
the open position. To prevent injury, make sure people and/or pets are completely through the opening before allowing
the storm door to shut freely.
WARNING
Storm door will close more quickly when entry door is open. To achieve the proper closing speed, you will need to adjust
OPPOSITE VIEW
OTRO PUNTO DE VISTA
VUE DE FACE
1.
Close the storm door. Swing the closer
assembly over until the door bracket is
resting against the door frame and is level.
Mark hole locations on the door frame.
2. Drill holes and attach the closer door
bracket to the door frame through the two
pre-drilled holes using two 5/8” screws from
the green bag.
3. Remove orange preload clip and properly
discard.
H
H
H
1/8”
!
!
1/2”
1/2”
1/2”
1”
1 1/2”
2”
1 1/2”
5/8”
5/8”
Tools needed:
1/8”
2”
x 3
x 1
x 2
x 1
x 1
5/8”
GREEN BAG / BOLSA VERDE / SAC VERT
!
!
1/2”
1/2”
1/2”
1”
1 1/2”
2”
1 1/2”
5/8”
5/8”
!
!
1/2”
1/2”
1/2”
1”
1 1/2”
2”
1 1/2”
5/8”
5/8”
i
i
VIEW
i
i
VIEW
i
i
i
i
i
i
i
i
i
VIEW
i
i
i
i
i
VIEW
i
i
i
i
i
VIEW
M
#8
#10
#12
#6
3/4” Machine Pan Painted
1/2” SMS Pan
1/2” SMS Pan Painted
1/2” SMS Flathead
1/2” Self-Drill Pan
1/2” Self-Drill Pan Painted
3/4” Machine Flathead
7/8” Machine Pan Painted
1” SMS Pan
1” SMS Pan Painted
1” Machine Pan Painted
1-1/2” Machine Flathead
1-1/2” Machine Flathead
2” SMS Pan Painted
5/8” SMS Pan Painted
1-1/4” SMS Pan