
Installation Guide


8
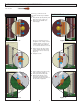
RIGHT HANDED - INTERIOR VIEWS
7. INSTALL CLOSERS
Tools needed:
6 - #10x2”
4 - #12x5/8”
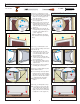
LEFT HANDED - INTERIOR VIEWS
2 -
2 -
In this step, you will install the door
closers.
Attach closer door bracket to the
door through the two pre-drilled
holes using two #12 x 5/8” screws.
(Figure 28)
Locate closer jamb bracket base
on jamb by touching the front of
the jamb bracket base to the back
of the hinge rail, and align the top
of the jamb bracket base with the
top of the window retainer channel
(Figure 29)
TIP: Jamb bracket base may not
always touch hinge rail. If parts do
not touch, visually align the front
of the jamb bracket base with the
back of the hinge rail.
Using the 1/8” drill bit, drill holes in
the door jamb through each of the
three pre-drilled holes in the jamb
bracket base.
Attach the jamb bracket base
to the door jamb with two #10
x 2” screws into the two holes
closest to the interior of the house.
(Figure 29)
Attach the closer jamb bracket arm
to the closer jamb bracket base
by inserting the tabs on the jamb
bracket arm into the holes in the
jamb bracket base. (Figure 30)
Secure with one #10 x 2” screw.
(Figure 31)
Pin bump closer in place using
the short pin in the jamb bracket
arm and the long pin in the door
bracket (Figure 23)
Repeat steps 1-6 for the top
closer.
1.
2.
3.
4.
5.
6.
7.
Figure 28
Figure 29
Figure 30
Figure 31
Figure 32
Figure 28
Figure 29
Figure 30
Figure 31
Figure 32
17
17 17
17
17
17
17
17
4
4