
Installation Guide


7
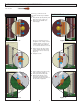
6. INSTALL RAIN CAP MOUNTING FLANGE, SCREW COVERS, AND WINDOW RETAINERS
Tools needed:
RIGHT HANDED - EXTERIOR VIEWS
In this step, you will install one of the
two rain cap mounting fl anges provided.
Choose the rain cap mounting fl ange
that best covers the gap present
above the rain cap.
Hook rain cap mounting fl ange to
rain cap. (Figure 22)
While hooked, push up on rain cap
mounting fl ange and use the 1/8”
drill bit to drill a hole in the mounting
surface through holes in fl ange.
(Figure 23)
While pushing up on the rain cap
mounting fl ange, fasten fl ange to the
mounting surface with two #8 x 1”
screws. (Figure 23)
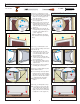
Starting with the rain cap screw
cover, insert a groove in the screw
cover into the bottom track of the
rain cap. (Figure 24)
Snap the groove in the top of the
screw cover into the top track of the
rain cap. (Figure 25).
Move along entire length of screw
cover, pressing every few inches to
snap into track.
Repeat Steps 5 and 6 to install the
remaining side screw covers.
Press the fl ange of the top retainer
fi rmly into the door channel (Figure
26) until you hear a snap. Continue
this process until the entire retainer
is snapped into the door frame.
Repeat step 8 for the bottom
retainer.
Loosen but do not remove the two
screws attaching the sweep to the
door, lower the sweep until the fi ns
lightly contact the door sill and then
re-tighten the screws. (Figure 27)
1.
2.
3.
4.
5.
6.
7.
8.
9.
10.
11.
LEFT HANDED - EXTERIOR VIEWS
BEFORE
AFTER
Figure 24
Figure 25
BEFORE
AFTER
Figure 24
Figure 25
Figure 23
Figure 22
Figure 22
Figure 23
2 - #8x1”
1/8”
1/8”
Figure 26
Figure 26
In this step, you will install the top and
bottom window retainers
In this step, you will install the screw
covers over the mounting screws in the
rails and rain cap
Figure 27
Figure 27
In this step, you will adjust the sweep.
1
1
11
11
5
INTERIOR VIEW
INTERIOR VIEW
NOTE: For additional seal against
rain, caulk above rain cap mounting
fl ange.
5