
Installation Guide


5
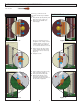
RIGHT HANDED - EXTERIOR VIEWSLEFT HANDED - EXTERIOR VIEWS
Tools needed:
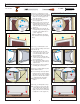
In this step, you will remove and
properly discard all orange installation
clips.
Grasp handle clip and pull away from
latch rail to remove. (Figure 13)
Fill holes in latch rail with color
matched plugs.
TIP: Use a screw driver to loosen
and tighten screws in Steps 3 and 4;
a drill may strip the screw holes. If
screws do strip, replace with #10 x
1/2” screws included in the closer kit
Remove spacer clips by loosening
screws, and then slide clip up and
pull away from door to remove clip.
(Figure 14)
Re-tighten screws.
Remove bottom spacer by pressing
down on raised lip. (Figure 15)
Properly discard all orange clips.
Starting at the mitered corners,
remove the clear protective tape
from both the interior and exterior of
the door frame, if applicable.
1.
2.
3.
4.
5.
6.
7.
4. REMOVE INSTALLATION CLIPS AND PROTECTIVE FILM
Figure 13
Figure 13
Figure 14
Figure 14
Figure 15
Figure 15
Figure 14
6
6
77
11
1
1
88
3
3