
Installation Guide


10
TROUBLESHOOTING
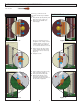
LEFT HANDED - INTERIOR VIEWS
RIGHT HANDED - INTERIOR VIEWS
If your door is not latching into your
latch rail follow the steps below.
Remove screw cover (if installed)
from the latch rail.
Remove six #8 x 1” screws from
latch rail. (Figure 39)
Push latch rail towards door frame
until latch falls into the opening in
the latch rail. (Figure 39)
NOTE: If you can see holes in
the mounting surface through the
holes in your latch rail, you will
need to drill new holes in your
latch rail. Use the 1/8” drill bit
provided in the closer kit to drill
holes 1” above or below existing
holes.
Fasten the latch rail to the
mounting surface using six #8 x 1”
screws (Figure 39)
Re-install screw cover (see step 6)
1.
2.
3.
4.
5.
Figure 39 Figure 39
Figure 37
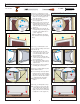
If your bottom spacer falls off or is out
of position prior to fastening the door
to the mounting surface, follow the
steps below to re-attach it to the door.
Hook the clip on to the sweep
(Figure 36)
Rotate the clip until it snaps over
the back of the sweep (Figure 37)
Slide the clip until it is touching the
sweep screw on the handle side of
the door. (Figure 37)
1.
2.
3.
Figure 36
Figure 36
Figure 37
If your handle binds or does not
spring back, follow the steps below.
Slightly loosen key cylinder and
trim plate screws. (A in Figure 38)
Test handleset, if the handle
moves freely you are done, if it still
binds proceed to step 3.
Slightly loosen escutcheon plate
screws (B in Figure 38).
1.
2.
3.
A
A
B
B
A
A
B
B
Figure 38
Figure 38
For additional help with
these, or any other
installation steps, please
call our Solution Center
at 1-800-933-3626