
Product Manual


Page 7 of 16 • Andersen Weight Distribution Hitch Installation Manual 7-2019 • www.AndersenHitches.com
SECTION 4: ATTACHING THE FRAME BRACKETS TO THE TRAILER
4-1. With the TRAILER STILL RAISED, attach both tension chains to the outside frame brackets using the hardware
shown below.
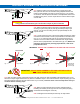
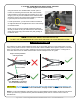
IMPORTANT!
Washer must be installed or
the nut will split the bushing
IMPORTANT!
Approx. 1 thread showing
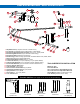
1. Insert the chain bolt into the SQUARE opening of the outside frame bracket (DO NOT thread it through the
round “washer” side rst). Make sure the chain is not twisted.
2. Place the red high-density urethane spring onto the protruding bolt.
3. Place the washer on the bolt (Fig. 4-1).
4. Thread the Tension Nut on the bolt until approximately 1 bolt thread is protruding from the end (Fig. 4-2).
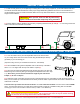
4-2. Pull the chains tight to get an idea of where the brackets will touch the frame and check for any obstructions or wiring
that might be in the way. With one thread showing at the end of the tension nut, the frame brackets will touch the frame at
approximately 28″ or 29″. See page 10 for bracket placement on ‘Y’ Style Trailer Frames.
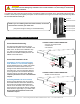
HOW TO HANDLE OBSTRUCTIONS
If you have any OBSTRUCTIONS or xtures on the frame that get in the way of the frame brackets, there are
two options:
1. Move/adjust the obstructing object forward or backward so it is out of the way. Some items like propane
tanks and batteries can be moved or raised using off-the-shelf frames or brackets. See your local Authorized
Andersen Dealer for further help and options.
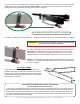
2. Accommodate for the obstructions by removing or adding links to the WD tension chains (on the shackle
end). You can SHORTEN the chain (up to approx. 5 links, leaving 10 or more links) or ADD several inches
to the chain (as many links as needed) with no adverse effect. If you do remove/add any chain links, be sure to
remove/add the same number of links from both chains. Chain extensions (Part #3366) can be ordered through your
authorized Andersen Dealer.
SHORTENING CHAINS: You can permanently remove chain links using bolt-cutters or other cutting equipment
OR you can insert a heavy-duty threaded link between the chain and shackle to effectively shorten the chains
without actually removing links — unused links will hang free. If you do not have bolt-cutters or other cutting
equipment and want to permanently remove chain links, see your local Authorized Andersen Dealer for help.
Approx. 1 thread showing
Approx. 28″ to 29″ (+/- 1″)
Center of
Brackets
Center of
Coupler
Fig. 4-1 Fig. 4-2
IMPORTANT! Since each set up can be different, only use this MEASUREMENT as an approximate position
to look for obstructions, NOT for pre-installing brackets.