
Installation Guide
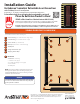


4
PLACE AND
FASTEN
ASSEMBLY
INTO OPENING
2
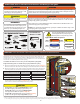
Tools Recommended:
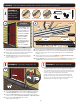
d Expand screen assembly by sliding Screen Housing side until the
Screw Flange is tight to the Mounting Surface.
c1 Verify the Latch Housing side Screw Flange is tight to Mounting Surface.
c2 With ⁄" bit provided, predrill through the three holes on the Latch
Housing side Screw Flange into the Mounting Surface a maximum
depth of ¾".
c3 With three of the #8 - 1" screws, fasten Latch Housing side of screen
assembly to the Mounting Surface. (Be careful not to over tighten)
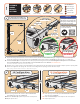
b1 The screen assembly will be narrower than your opening until fully
expanded in the following steps.
b2 Start by placing the Screen Assembly onto the exterior Trim Surface,
with the Screw Flanges extending into the Door Opening. Rest the
bottom of the screen assembly onto your sill or support blocking.
b3 Slide the screen assembly in the door opening until the Latch Housing
side Screw Flange is tight to the Mounting Surface.
c
#8-1"
(Qty 6)
SCREW PACK
#8
#10
#12
#6
3/4” Machine Pan Painted
1/2” SMS Pan
1/2” SMS Pan Painted
1/2” SMS Flathead
1/2” Self-Drill Pan
1/2” Self-Drill Pan Painted
3/4” Machine Flathead
7/8” Machine Pan Painted
1” SMS Pan
1” SMS Pan Painted
1” Machine Pan Painted
1-1/2” Machine Flathead
1-1/2” Machine Flathead
2” SMS Pan Painted
5/8” SMS Pan Painted
1-1/4” SMS Pan
SCREEN
ASSEMBLY
DOOR
OPENING
MOUNTING
SURFACE
MOUNTING
SURFACE
SCREW
FLANGE
SCREW
FLANGE
#8 1"
SCREW
SCREEN
HOUSING
LATCH
HOUSING
LATCH
HOUSING
d
TRIM
SURFACE
b
SCREW
FLANGE
MOUNTING
SURFACE
EXPAND
EXPAND
DOOR OPENING
HANDLE
DOOR OPENING
HANDLE
SCREEN HOUSING SCREEN HOUSING
a1 With a Scissors, cut Plastic Wrap
along inside edge of Screw Flange.
a2 With the interior of the screen
assembly facing the door opening,
rotate the assembly so the Screen
Housing is on the opposite side
of the Door Opening Handle.
a
OR
PLASTIC WRAP
SCISSORS
SCREW FLANGE
Drill
1/8 Drill Bit
(provided)
Screwdriver
Scissors