
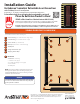
Installation Guide


3
A
36
32
A
ASSEMBLE
SCREEN
TRACKS &
HOUSINGS
1
A
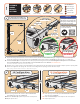
a1 Unpack the housings and screen tracks onto a non-abrasive surface, with the side labeled Interior facing up. Leaving the screen in the retracted position,
arrange the components so the letters marked on the Screen Tracks and the letters marked on the Endcaps align (A to A, B to B, C to C and D to D).
a2 Conrm the Fastener Clips on endcaps A and C are in the open position. Starting at corner A, slide the Receiving Tab on Endcap A inside the Screen Track.
Ensure the Receiving Tab ts inside the Screen Track, and the Screen Track slides into the Channel. (see “correct” above).
(Visit AndersenLuminAire.com/Install to view a video of this step.)
a3 Repeat for corner C, then continue to corners B and D. They do not have Fastener Clips, which allows the door assembly to adjust to your door opening width.
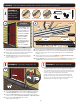
a4 Use the “36 Conguration” for openings 34 - 36 ⁄" wide or “32 Conguration” for openings less than 34" wide in step b.
(If the opening is narrower than 31 ⁄" wide, See Appendix A on page 6.)
b1 If the opening is between 34" and 36 ⁄", adjust Screen Track A
until 36" line aligns with edge of Endcap A.
b2 Rotate the Fastener Clip up until it snaps into the closed position.
b3 Repeat steps for side C.
b1 If the opening is less than 34", adjust Screen Track A until 32" line
aligns with edge of Endcap A.
b2 Rotate the Fastener Clip up until it snaps into the closed position.
b3 Repeat steps for side C.
A
A
A
36
32
RECEIVING TAB
SLIDES INSIDE SCREEN TRACK TUBING!
A
A
A
32
36 Configuration
(use for opening widths between 34" to 36
-
⁄")
32 Configuration
(use for opening widths less than 34")
A
A
A
36
32
FASTENER CLIP
IN OPEN POSITION
INTERIOR
LABEL
INTERIOR
LABEL
SCREEN
TRACK A
SCREEN
TRACK A
CHANNEL
FOR SCREEN TRACK
CHANNEL
FOR SCREEN TRACK
ENDCAP A
ENDCAP A ENDCAP A
A
C
B
D
A
C
B
D
FASTENER CLIP FASTENER CLIP
36" LINE 32" LINE
SCREEN TRACK A SCREEN TRACK A
b
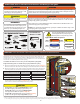
Screen Housing Latch Housing Screen Track (A/B) Screen Track (C/D)
KEY REFERENCES
D
A
A
A
36
32
CORRECT
INCORRECT
RECEIVING TAB
FITS INSIDE SCREEN TRACK
RECEIVING TAB
FITS INSIDE SCREEN TRACK
RECEIVING TAB SHOULD NOT
BE OUTSIDE SCREEN TRACK
Visit AndersenLuminAire.com/install
to view a video of this step.
Screw Flanges
Receiving Tabs
Letter Labels
Fastener Clips
OR
1
2
11
3
4
4
3 3
3
3
22
ALL ITEMS DURING THE ASSEMBLY STEPS
SHOULD BE LAYING FLAT ON THE GROUND
a
Receiving Tabs on the Endcaps must
slide inside the Screen Track. Product
damage may occur if Receiving Tab is
forced outside the screen track.
NOTICE