
Use and Care Guide
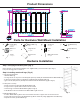

Product Dimensions
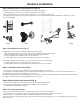
Parts for Hardwire Wall Mount Installation
Screw
4 + 1 pcs
Metal Wall Leg
4 pcs
Set Screw
4 + 1 pcs
Plate
1 pc
Small Allen Key
1 pc
Large Allen Key
1 pc
4 + 1 pcs
Ø 8 mm
4 pcs
Large Screw
4 + 1 pcs
4 pcs
Wall Plate Screws
2 + 1 pcs
Wall Post
Plastic plug
Plastic insert
Ensure all parts for mounting installation were supplied with your towel warmer (See Fig. 1).
If any are missing, please contact us.
Step 1: Verifying installation parts (Fig. 1)
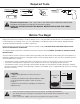
Hardwire Installation
— 3 —
Fig. 2
Locate the following parts:
Position parts correctly:
Install Metal Wall Leg d:
) 2 .giF( sgel llaw latem gnillatsnI :2 petS
a
b
c
d
e
f
g
h
i
j
k
Fig. 1
o d: Metal Wall Leg.
o e: Large Screw to set post in main body (this part may already be installed inside the Metal Wall Leg).
o f: Plastic Insert (this part may already be installed inside the Metal Wall Leg).
o g: Set Screw (this part may already be installed inside the Metal Wall Leg) (See Fig. 6).
o Plastic Insert f is positioned inside Metal Wall Leg d.
o Large Screw e is positioned inside the Plastic Insert f.
o Set Screw g is inserted in Metal Wall Leg d (See Fig. 6).
o If the Metal Post b is inserted into the Metal Wall Leg d, remove it.
o Position Metal Wall Leg d onto the towel warmer where the Large Screws e can be inserted.
o Insert Large Screw e and screw Metal Wall Leg d into main body using appropriate sized Allen key.
o Repeat for all four (4) Metal Wall Legs.