
Installation Guide


Installations (refer to Page 4 for parts):
NOTE: Use threaded drywall anchors only when
mounting the hood on sheet rock. Mounting
the hood on wall studs or lumbars is highly
recommended.
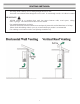
Step 1: Measuring
•
The custom hood must be constructed to fit the size and shape
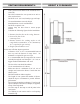
Step 2: Preparing the cabinet
•
To minimize the gap around the power pack, take actual width and depth measurements of power pack
and add 1/16" to get D and E measurements. Cut the hole in the bottom of the cabinet according to
dimensions.(See Fig #2)
Step 3: Remove Filters
•
Remove tape on filters. Remove filters from power pack and set aside.
NOTE: It is recommended to start with the center one(s).
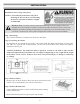
INSTALLATION:
Hardware Note: For safety reasons, range hood mounting screws and anchors will not be
included due to the variation of cabinetry constructions and wall material. Please consult your
installation specialist regarding the optimal type of mounting screws and wall anchors to suit
your home’s construction. Always follow all applicable construction codes and standards.
10
SAFETY WARNING: The framework must be positively secured to wall studs or other wooden
framework behind the drywall. Make sure it is capable of supporting its own weight and the weight
of the CP34. CP 35 or CP37. Failure to do so may cause personal injury or damage to countertop
or cooktop.
Step 4: Remove Bottom Panel
•
Using a Phillips screwdriver, remove both bottom panel retaining
screws and set aside.
•
Disassemble bottom panel from power pack and set aside.
Fig#1
Fig#2
Fig#3
Fig#4