
Installation Guide


REPLACEMENT INSTALLATION:
SAFETY WARNING: Risk of electrical shock. This range hood must be properly grounded. Make sure
this is done by a qualified electrician in accordance with all applicable national and local electrical codes.
Before connecting wires, switch power off at service panel and lock service panel to prevent power from
being switched on accidentally.
Step 5: Venting
certified aluminum or foil tape so that it is air tight. Please check the
Step 7: Installing Filters
Step 4: Installing the Hood
hood
•
Using measurements provided on Page 15, measure and drill
4 holes into bottom of cabinet. (See Fig #6)
• Depending on exterior venting chosen (See page 7), use
measurements provided on Page 15 and cut vent hold in cabinet.
• Align range hood to the holes in the bottom of the cabinet and
screw in using the supplied screws. (See Fig #6)
Fig #6
Fig #9
9)
building codes in your city to learn which tape product is recommended.
13
Fig. # 7
Fig. # 8
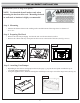
Step 6: Electrical Connection
HOHFWULFDOZLUHV.
&RQQHFWFDEOHWRUDQJHKRRGZLULQJ6HH)LJ7
Connect BLACK to BLACK, WHITE to WHITE and GREEN to
GREEN
.
DON’T
FORGET
TO CONNECT
THE GROUND!
*UHHQZLUH
•
6HFXUHDOOWKHOHDGVLQVLGHWKHPCB box.
•
WARNING: ALL CONNECTORS MUST BE ENCLOSED
IN THE PCB BOX. (See Fig #8)
•
Open the PCB box
ZLWKD3KLOl
LSVVFUHZGULYHU
.
•
3OHDVHXVHWKHEXVKLQJSURYLGHGRQWKHFXWRXWRSHQLQJWRSURWHFWWKH
•
•
•
6HFXUHWKHPCB box with its screw.