ASSEMBLY INSTRUCTIONS 20 x 30’ Shown F3 FRAME TENT SALES OFFICES: 1100 BURCH DRIVE PO BOX 3477 EVANSVILLE, IN 47733 USA EC4762 PHONE: 812-867-2421 FAX: 812-867-0547 1-800-544-4445 EMAIL: tents@anchorinc.com www.anchorinc.
Table of Contents PAGE NO.
General Notes: • The installation manual describes in a methodical manner the assembly and erection of the Anchor frame tent. Please read all instructions before the installation or removal of this product. • Installer must determine the number of persons and the proper equipment required for each installation. • Work from step to step.
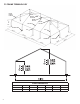
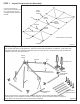
F3 FRAME TERMINOLOGY EAVE/ RIDGE PURLIN EAVE/ RIDGE PURLIN RIDGE INT/INT 7’ 8’ 10’ RAFTER RIDGE HIP/INT BASEPLATE HIP INT.
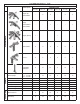
COMPONENT LIST WELDMENTS Description HARDWARE FRAME Fixed Upright 20’ Rafter QUANTITIES 20’ x 20’ 20’ x 30’ 20’ x 40’ 30’ x 30’ 30’ x 45’ 30’ x 60’ Ridge Hip/ Intermediate - 2 2 - 2 2 Ridge Intermediate/ Intermediate - - 1 - - 1 Ridge Hip/Hip 1 - - 1 - - Intermediate 4 6 8 4 6 8 Corner 4 4 4 4 4 4 Adjustable Baseplate 8 10 12 8 10 12 7’ - 6’-6 3/8” 8’ - 7’-6 3/8” 10’ - 9’-6 3/8” 8 10 12 8 10 12 10’-7 7/16” 4 6 8 - - - 30’ Rafter 16’-2 1/2”
STEP 1 Layout Components for Assembly Layout components as shown for your particular size tent. Square tents will use the Ridge Hip/Hip Weldment at Peak. EAVE/ RIDGE PURLIN RIDGE INT/INT INT. EAVE/ RIDGE PURLIN RAFTER RIDGE HIP/INT HIP Frame shown is a 30’ X 60’ INT. CORNER STEP 2 Figure 1 Begin connection of components Begin by attaching rafters to ridge weldment. Align slots in tubes with Stop Buttons on weldment.
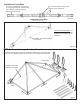
Installation Cross Web Cross web is installed by running ends of Cross web around Int. weldment and thru U-Bolt on outside of weldment. Attach ring back to hook. After ends are attached, tension the strap using the cam buckle. Installation Cross Web Figure 2b For 30’ Frame only Important Dismantling Note: For Ease in Dismantling (30’ model), Installation Cross Web must be reinstalled. Installation Cross Web Installed on 30’ Frame.
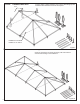
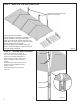
STEP 4 Connect next arch Arch Connect rafters to Ridge weldment, then connect Eave/Ridge purlins. Continue in like manner at next Arch as required. Installation Cross Web Installed on 30’ Frame. Figure 4 STEP 5 Connect next arch and other hip end Continue connections as shown previously until entire frame is connected and sitting on the weldments.
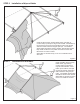
STEP 6 Installation of hip end fabric Unroll hip fabric and lay loosely beside frame, right side up. Connect snap of pull rope to ring at end of kedar. Feed kedar up into channel a few inches, then pull fabric up and over through channel in rafter extrusion using the pull rope. One installer should watch as kedar is fed into channel, while another should keep hands on fabric as it is pulled over frame to ensure that fabric does not catch on frame.
STEP 8 Raise one side with Frame Lifts Place frame lifts as shown and attach to eave purlins. Attach uprights to base plates. Attach uprights to weldments on one side once the side is raised to the appropriate height. When one side has all uprights attached, move frame lifts to the other side, and raise frame until the end uprights can be attached. After these uprights are installed, frame may need to be lowered slightly so that the final side can have uprights attached.
STEP 9 Tension fabric to frame - cont’d Start tensioning web straps to full tension in the order shown by the numbers. Tension first (2) Corners and then go to point 3. 5 6 4 7 2 9 Corners must be equally tensioned so that punch slot in fabric is centered on U-bolt in Weldment. Check that all tension points look level across end of tent. Watch for wrinkles in fabric radiating out from tension points. This may signal that tension is too tight or unbalanced. Fabric should be smooth.
EVANSVILLE, INDIANA PHONE NUMBER 812· 867· 2421 FAX NUMBER 812· 867· 0547 Anchor products are of superior design and operate best within the parameters of these instructions. It is imperative that the instructions be carefully read and COMPLETELY FOLLOWED. Please read installation instructions before the installation or removal of this product. Installation instructions are available online at www.anchorinc.com or by calling 1-800-544-4445. CAUTION: 1.