
Product Manual


8
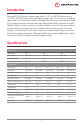
This charger features user selectable 2 or 3 stage charging. The charging prole is selected by
moving the slide switch on the front panel up to 3 stage or down for 2 stage charging.
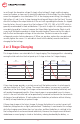
A two-stage charger provides a constant current until the battery reaches its rated capacity
and then switches to a “oat” voltage. The current then reduces as necessary to maintain
the battery at the oat voltage. The charger can be connected to the battery indenitely and
will provide the appropriate prole. A two-stage charger is recommended in most instances
since it is the most versatile and can be permanently connected to attenuate the characteristic
discharge of unused batteries. A load can be put on the battery or batteries without altering
its ability to keep the battery at optimal charge.
A three-stage charger is the fastest charger. It charges the battery at a constant current until
the battery voltage reaches a slightly elevated level. The battery is maintained at this voltage
while the charging current diminishes to a low value, and then the battery is switched to the
oat voltage where it can be maintained indenitely. However, the charger cannot differenti-
ate between a current going to a load on the battery, or being absorbed by the battery, so
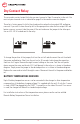
100%
75%
50%
25%
0%
Bulk
(Constant Current)
Float
(Constant Volts)
Time
Two Stage Charge
Volts
Amps
100%
75%
50%
25%
0%
Bulk
(Constant Current)
Absorption
(Constant Volts)
Float
(Constant Volts)
Time
Three Stage Charge
Volts
Amps
2 or 3 Stage Charging
ies will reach the absorption voltage (3-stage) or oat voltage (2-stage), and the charging
current will reduce as necessary to maintain the batteries at that voltage. Once the charging
current has dropped to a low level (about 15% of the charging current rating), the charging
light will go off, and if set to 3-stage charging the voltage will drop to the oat level. You may
check this voltage at the output terminals of the unit with a good digital voltmeter. As shipped
from the factory, the unit is preset for a oat voltage of 13.6, 27.2, 36.3 or 54.4 VDC, which is
generally recommended for lead-acid batteries. If you wish to adjust this voltage, remove the
cover plate (secured by 2 screws) to expose the Output Adjust potentiometer. Reach in with
a very small at blade screwdriver to rotate the potentiometer. Please note that this adjusts
both the oat and absorption voltages at the same time. Clockwise increases the output
voltage and counter clockwise decreases it. When you are done, replace the cover plate and
securely tighten the screws. It is advisable to check with the battery manufacturer before
changing the oat voltage.