
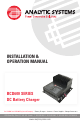
Product Manual


7
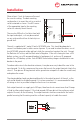
Installation
Allow at least 1 inch of clearance all around
the case for cooling. The best mounting
conguration is to mount the unit on a vertical
surface oriented as shown. Use #10 screws
of the appropriate type for the mounting
surface to securely mount the unit.
The case has 500 volts of isolation from both
the input and output, so it may be mounted
on any surface without fear of electrolysis or
ground fault.
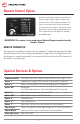
ON/OFF
INPUT POWER
RED
BLACK
OUTPUT
ADJUST
OVERLOAD
OVERTEMP
LOW OUTPUT
LOW INPUT
POWER
OUTPUT 1
OUTPUT 2
OUTPUT
FUSE
OUTPUT
FUSE
INPUT
FUSE
TO
REMOTE
INPUT
FUSE
The unit is supplied with 1 metre (3 feet) of #10 AWG wire. This should be adequate to
connect to a breaker panel or other source of power. If you need to extend the wires, use at
least #10 AWG wire and solder and heat shrink the connection to protect the joint. Connect
the Red wire to Positive, and the Black wire to Negative. If the unit is being run from a 24V
battery system, use a 30 amp panel breaker to feed power to it, and use a 20 amp panel
breaker for a 32V battery system. Each BCD600 Series battery charger should have its own
breaker in the panel.
To reduce radio noise to the absolute minimum, it may be necessary to bond the case to the
vessel ground. To do this, remove one the screws that mounts the output terminal strip to the
chassis. Then place a #6 ring terminal with a ground wire crimped to it under the screw head,
and replace the screw.
The charging battery bank may be wired direcvtly to the output terminals of the unit, or the
unit can be wired to a distribution panel if it is more convenient. It is recommended to keep
all wiring as short as possible to keep the line losses to a minimum.
Each output terminal can supply up to 25 Amps, therefore do not connect more than 25 amps
of load to either output terminal. If the load exceeds 25 Amps but not the continuous rated
output of the unit, do the following: The output terminals must be connected to the load in
parallel ensuring that the wiring used has sufcient capacity to handle the current.
OUTPUT 1
OUTPUT 2