
Manual
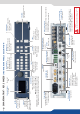

in Matrix mode, select to set the output types and resoluons of Output #1
in Matrix mode, select to set the output types and resoluons of Output #2
select to congure Video output card sengs
select to congure the 10 individual input types and resoluons
select to store and use presets
select to change source image sengs of an input
select to access keying and tling controls and parameters when video
layer is selected
setup your background color and your Quick Frame
select to adjust layer size, posion, border, transparency or transions
select to store (record), use and manage logos and frames into the
SmartMatriX²
select to access all audio input and output parameters
select to access device soware informaon, LAN sengs, reset factory set-
ngs, amongst other user oriented funcons (see next page)
Select an .
Select an .
Select an (open/close)
Press to view the result on the output
Select an .
Press the buon.
Select an input.
Adjust the layer with buon (Pos & Size
or Zoom)
Select a transion (open/close) or an eect into Layer
menu [Home menu]
Press to view the result on the Program screen
To remove layer, press
For another layer setup, repeat from step #1
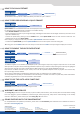
Press the buon from the Home menu (all
funcons must be conrmed by the buon)
Select
Select , then the
On Format line, select the display’s nave resoluon
Control or adjust your display device (Monitor or Video
Projector)
If necessary, select in the Output menu
Press the buon from the Home menu (all
funcons must be conrmed by the Enter buon)
Press and
If the acquision is successful the source appears on Preview.
If the acquision has failed, check all connecons and perform
a manual setup
For a comprehensive Input Setup, please refer to user’s
Manual
For a manual input setup, press the buon:
a) Press ,
b) Select the right input from Input #1 up to SDI #4, then
c) Select ,
d) Select and choose the input type.
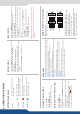
#1 = Source is on the Program output
#2 = Freeze enable
#1 = Source is on Preview
#2 = Funcon available for modicaon
#3 = Current output on Matrix mode
Layer/source selected or is currently acve
on the Program output
Layer/source selected or is not currently
acve on the Program output
To adjust layer Size or Pos, use the Layer Menus. To adjust
Blanking, use the Auto Centering or Blanking adjustments in the
Image menu.
Inputs #1 to #4: balanced & unbalanced connecon
Inputs #1 & #2: DVI embedded audio HDMI
Inputs #3 & #4: DVI and HDMI embedded audio HDMI
Inputs SPDIF #1 and #2: digital audio inputs
Inputs HDMI #1 and #2: embedded audio HDMI
Inputs SDI #1 to #4: embedded audio SDI
Outputs #1 and #2: balanced & unbalanced connecon
Outputs SPDIF #1 and #2: digital audio outputs
Output SDI: embedded SDI audio/video output.
L+
L-
R+
R-
UNBALANCED
Left
Right
GROUND
GROUND
GROUND
L+
L-
R+
R-
BALANCED
L+
R+
L-
R-
GROUND(S)