
User guide


41
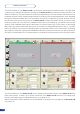
The Smart Vu LE allows the creation of user dened presets very
easily. Any setup you have congured on screen, can be stored into
one of the 4 available user presets.
1/ After having congured layers, PIP transitions, logos... on your
screen (see “Working With the RCS” chapter), click on one of the
four available Preset buttons.
2/ In the dropdown menu, choose Save From Main or Save From Preview
to determine which screen you want to memorize the preset from.
3/ By clicking one of the two options, the RCS will automatically load
and preview the selected Preset.
4/ Click the Take button to view your preset on the Main screen.
Creating presets
Working with presets
Working with audio
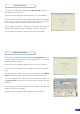
The four Smart Vu LE user presets can be called back at any stage
during your show or event.
1/ Click one of the four available Preset buttons to choose which
memory you wish to use. Select Load to Preview from the dropdown
menu, your preset will appear on the Preview screen.
2/ Once you have selected your preset, simply click the Take button
to view the result on your main screen.
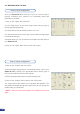
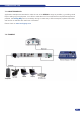
The Smart Vu LE allows to work with up to 5 stereo inputs, 1 auxiliary input, and 2 embedded SDI audio
inputs (via the SDI BNC connectors), all accessible via the Audio menu of the Smart Vu LE, and which can
be affected to one or both of the 2 independant symetrical/asymetrical outputs of the device.
To congure audio settings of the Smart Vu LE, plug all audio inputs
into the device, and click on the Audio tab of the RCS home page.
1/ Set the Main audio output level and delay (accessible only if Delay
Mode is set to Manual Adjust, see also the “Audio Conguration”
chapter), or click the Mute button to mute Main audio output.
2/ Repeat step 2 for the Prelist audio output.
3/ Individual source settings (level and balance) for each audio input
can be congured in the right hand section of the Audio tab.
Audio Conguration