
Manual


RKD8044-T
RKD8044-T
PAGE 7
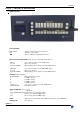
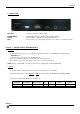
2-2. REAR PANEL
ON / OFF: AC Power switch (O = OFF, I = ON).
POWER INPUT: Standard IEC connector (100-250 VAC, 50-60Hz automatic).
RS-232: RS-232 connector (DB9 M) for connecting the Diventix 2
LAN: RJ 45 connector for connecting the Diventix 2 (cross cable) or to LAN (Direct cable)
Chapter 3 : CONNECTING THE RKD8044-T
3-1. RS-232
Connect the RS-232 connector of your switcher to the RS-232 connector of the RKD8044-T with the supplied
REMOTE cable.
Connect the AC power supply cord to the RKD8044-T.
Power "ON" the Remote Control Unit with the power switch (rear panel).
Turn ON all of your sources, the switchers, the projectors, and the local monitors.
NOTE: Always set the T-BAR to the bottom position before switching ON or OFF the RKD8044-T.
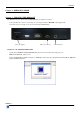
3-2. LAN
Connect the LAN port (RJ45 connector) to your network according to your installation
Setup the LAN parameters of the RKD8044 in UDP mode using LCD menu “Control”-“LAN Setup”-“UDP”.
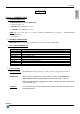
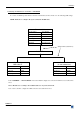
Sum up of the example TCP/IP addresses in UDP mode:
PRODUCT Local Address Remote Address
Local
Port
Remote
Port
Gateway
Address
Netmask
DVX8044
192.168.000.010 192.168.000.255 10500 10500 192.168.000.001 255.255.255.000
RKD8044-T
192.168.000.002 192.168.000.010 10500 10500 192.168.000.001 255.255.255.000