
u User Manual


39
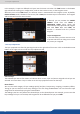
When you enter into the Edit menu, you
will encounter by default this window.
On this example, we have the Screen 1
Program and the Screen 1 Preview. The
following example can be applied for any
other output conguraons.
7.3.1 Layer management
7.3 Edit
To display an input into one of the
available layers A or B, simply drag and
drop the input from the le column to
the layer on the chosen screen. You can
assign or change the inputs directly on
Program as well as Preview.
To display a logo, open the frame list column (next to the source list) and then drag and drop the desired
frame onto the frame layer.
You can assign a source to a layer by dropping the selected source into the layer leer icon, located on the
le side of the layout window. This is parcularly useful when the desired layer is hidden or blocked by other
layers.
When a layer contains an input and is not empty, the
RCS² displays the input number or a customizable
thumbnail icon that represents your input.
Please note: this thumbnail is not a live image.
The layer B will always acvate the
keying feature on the source aached. Go
into image sengs to set up the keying.