
X Instruction Manual


51
8.2.12 Creang presets
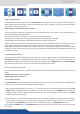
STRETCH UP
HARD
STRETCH RIGHT HARD
STRETCH LEFT HARD
STRETCH CURTAIN
IN HARD
STRETCH CENTER
OUT HARD
STRETCH CENTER
IN HARD
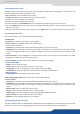
It is possible to store up to 8 frames in the QuickMatriX non volale memory. To capture a frame, display the
exact content you want to save on one of your outputs, at the exact resoluon, you can use the freeze buon
if you want. Then follow this step:
Choose the frame number slot and wait unl the unit nishes to save. Your frame is now saved and you can
use it through the Quick Frame buon.
The capture of frames can be done only under the following condions:
- The capture can be done from the Program output #1 or the Program output #2,
- The disappearance of frames on the Program output is normal during saving.
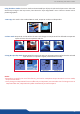
A frame captures the state of the specied output at the output resoluon, and must be recalled using the
same output resoluon. Resizing or other image manipulaon of the captured frame is not possible.
Aempng to use a frame at a dierent resoluon will result in a paral frame display or a frame which does
not ll the screen. During the capture, the output is outlined by a white border and includes the pixels into
the white rectangle.
Frames are mainly used as quick frames in a typical show or event setup, and can be recorded from any of the
QuickMatriX 8 sources and called back at the press of a single buon. To use a frame, be sure rst that it is
well saved, then aect the frame to the Quick Frame layer going into the SCREEN menu then QUICK FRAME.
To acvate the Quick Frame, simply press the front panel Quick Frame buon.
In the frame input setup menu, you have the possibility to save a frame, and the possibility to erase a stored
frame:
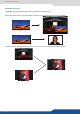
The QuickMatriX allows the creaon of user dened presets very easily. Any setup you have congured on
screen, can be stored into one of the 8 available user presets.
1. Aer having congured layers, transions, ... on your screen, go to the Preset menu by pressing the EXIT/
MENU buon, and select Preset by rotang the scroll knob. Then, press the ENTER buon to enter the
Preset sub-menu. Choose Preset Copy by scrolling with the corresponding knob, and press the ENTER
buon to access the sub-menu.
2. In the sub-menu, choose both screens or only Screen 1 or Screen 2 to determine which screen you want to
memorize the preset from, then set the preset memory (#1 to #8) you wish to use as your “User Preset”
(by default, the QuickMatriX will choose the next available preset in the QuickMatriX memory).
By pressing the ENTER buon, the QuickMatriX will ask you to conrm. Select Yes, your screen is memorized
as a preset.