
User guide


It is possible to store up to 6 logos in the PLS300 non volatile
memory. Logos work in much the same way as frames, and can be
recorded from any of the PLS300’ 10 sources. Logos have more
attributes than frames. They can be sized, positionned, but also
keyed via color cutout selection or luma key.
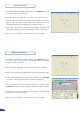
1/ In the Input Selection section, click the source button (#1 to #10)
of the source you wish to record as a logo. Press [TAKE] to display
the input on the Main display.
2/ In the Logos/Frames tab, click Record Logo, then select an empty
logo memory slot (#1 to #6) to record your logo into.
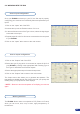
3/ Adjust position, size and keying attributes for your logo.
4/ Click Execute to record your logo into the selected memory slot.
The PLS300 RCS will display a progress bar while recording the
logo.
5/ In the Input Selection section, click the [LOGO1] button, and select
logo number (#1 to #6) you wish to use. Your logo will appear on
the preview screen above any existing layer on screen.
6/ Click the [TAKE] button. Your logo will appear on the main display.
Working with logos
Memorizing logos
Layer transitions & effects
The PLS300 offers a wide variety of transitions between the scenes
you create for your shows and events. It allows for live recall of 4
user presets, each of which you can be edited at any given time.
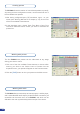
1/ In the Layer Selection section, click the PIP button. On your Preview
screen, PIP1 will appear as a color rectangle. The parameters of
the layer will automatically appear in the RCS Preview section.
2/ At the bottom of the Preview section, click on the Transition tab,
then select the transition type from the left dropdown menu, and
the effect behaviour from the right dropdown menu.
3/ Determine the effect duration by sliding the duration bar left
(shorter) or right (longer), or by manualy setting the value in the
duration value box.
4/ Repeat the procedure in the Out Transition tab to determine the
way your layer will close.
47