
User guide


The RCS software for your PLS300 can be viewed as the software version of the PLS300 front panel menu
section. It allows you to quickly access all of the PLS300 functions via a single page interface, and easily edit
your settings directly from your laptop or PC.
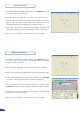
Before starting with the RCS software, you must establish a connection from your laptop to the PLS300 you
wish to run.
Software overview
4
5
6
2
3
7
8
9
10
1
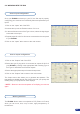
The RCS software for your PLS300 is composed of several easily identied sections. The tabs menu (1)
allows you to navigate through the equivalent of the PLS300 front panel menu items (see also “The PLS300
Menu”). The green window of the RCS (2) represents your Preview window, and can be used to parameter
sources, frames, layers and logos directly by clicking on the corresponding button, then navigating through
the different available tabs. The red window of the RCS (3) represents your Main window, and can also be
used much like the front panel of the PLS300. Create user presets directly in the RCS main window, by
clicking on one of the four available Preset icons (4) and setting up your preset in the Preview window. Clear
unwanted steps with the CLEAR button (5), reload a fresh copy of your screen via the Reload Main button (6),
make smooth takes directly with your mouse or trackpad with the virtual T-bar (7). The TAKE button (9) will
allow you to view any changes made to your preview screen on your main screen, and Analog Way engineers
have even implemented a STEPBACK button (8) to quickly move back to your previous setup in the case of
a manipulation error. The status section (10) allows for easy monitoring of the connection status.
43