
Manual


40
Working with Audio
Working with Preset Layouts
The OPS300 allows to work with up to 10 stereo inputs, 1 auxiliary input, and 2 stereo embedded SDI audio
inputs (via the SDI BNC connectors), all accessible via the Audio menu of the OPS300, and which can be
assigned to one or both of the 2 independant symetrical/asymetrical outputs of the device.
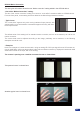
On the OPS300, a list of pre-saved preset layouts can be recalled at any time:
1. Go in the “Preset Menu” and choose “Preset Layouts”
2. Now you have access to a list of 12 layouts. Select the desired pattern and press OK to apply this
pattern to your current preview.
3. Press [TAKE] to see the result on the main output.
Creating Presets
The OPS300 allows the creation of user dened presets very easily. Any setup you have congured on
screen, can be stored into one of the 4 available user presets.
1. After having congured Layers, PIP transitions, logos... on your screen (see ‘Working with the OPS300’),
go to the Preset menu by pressing the [EXIT/MENU] button, and select Preset by rotating the scroll knob.
Then, press the [ENTER] button to enter the Preset sub-menu. Choose Preset Copy by scrolling with the
corresponding knob, and press the [ENTER] button to access the sub-menu.
2. In the sub-menu, choose Save From Main or Save From Preview to determine which screen you want to
memorize the preset from, then set the preset memory (#1 to #4) you wish to use as your “User Preset”
(by default, the OPS300 will choose the next available preset in the OPS300 memory).
3. By pressing the [ENTER] button, the OPS300 will ask you to conrm. Select Yes, your screen is memorized
as a preset.
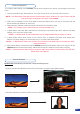
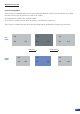
In Mixer Mode: In the preset Menu, some already existing preset are available in the preset layout menu.
Choose your layout with associated PIPs and TAKE it to the main to see the result.
You can at any time memorize those presets in one of the preset memory buttons.
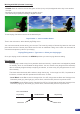
Working with Presets
The four user presets of the OPS300 can be recalled at any stage during your show or event.
1. Press the [PRESET] button, then press one of the four rst Input Selection section buttons to choose which
memory (#1 to #4) you wish to use. The preset will be displayed on your preview screen.
2. Once you have selected your preset, simply press the [TAKE] button to view the result on your main
screen.