
Manual


6►[EFFECT]
This menu allows storing an effect in each of the effect buttons (EFFECT PRESET).
① First select an effect button with LCD menu or with the front panel button.
② Then select one of the following effects:
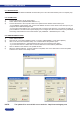
6-x-1 [Cut] : allows switching seamlessly the pre-selected input onto the MAIN output.
6-x-2 [Fading] : allows fading the pre-selected input to the MAIN output. You can select the duration of the
transition as indicated below :
• [1s] : 1 second transition.
• [3s] : 3 second transition.
• [5s] : 5 second transition.
•[Custom]:Selectadurationfrom0.5secondupto25secondsby0.5secondsteps.
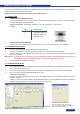
6-x-3 [Title] : Allows overlaying a title on the MAIN output. The title should be created using software such
as PowerPoint : the text should be bright (yellow, white) on a black background. A shadow bar is also
available for increasing the readability of the text on bright images
① Select the [duration]ofthetransitionwith◄►+ENTER between :
• [holding] : The text appears after pushing on the TAKE button, and will be removed only by a second
push on the TAKE button.
• [3s] : 3 second transition.
• [5s] : 5 second transition.
• [custom]:Selectadurationfrom0.5secondupto25secondsby0.5secondsteps.
② Select the [Size]oftheshadowbarwith◄►+ENTER.
③ Select the vertical [Position]oftheshadowbarwith◄►+ENTER.
④ Select the [Intensity]oftheshadowwith◄►+ENTER.
⑤ Select the [Effect opening] and the [effect closing] of the title between [Cut] & [Fade]with◄►+ENTER.
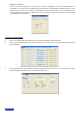
6-x-4 [PIP] : Allows displaying a picture into another picture. The PREVIEW image is reduced and displayed
onto the MAIN image.
① Select the [duration] of the transition, and validate with ENTER.
• [holding] : The PREVIEW image appears after pressing on the TAKE button, and will be removed only
by a second push on the TAKE button.
• [3s] : 3 second transition.
• [5s] : 5 second transition.
• [custom]:Selectadurationfrom0.5secondupto25secondsby0.5secondsteps.
② Adjust the [Image size] of the PIP with H and V, and validate with ENTER.
③ Set the horizontal and vertical [Image position] of the PIP with the H and V knob, and validate with
ENTER.
④ Adjust the [Window size] of the PIP with the H and V knob, and validate with ENTER. This function
allows, for example, cutting the black bars of a letterbox source.
⑤ Adjust the [Window position] of the PIP with the H and V knob, and validate with ENTER.
⑥ Select the [Effect opening] and the [effect closing] of the PIP between [Cut] & [Fade] with ◄►
+ ENTER.
PAGE 33