
Manual


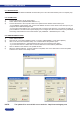

► If the selected input type is a COMPUTER signal the IMAGE MENU displays :
4-1 [Centering] + ENTER.
Adjust automatically the image in the centering pattern.
4-2 [Pos. settings] + ENTER.
Selectoneofthefollowingfunctionswith◄►+ENTER.
4-2-1 [H position] + ENTER.
AdjusttheHorizontalpositionwith◄►+ENTER.
4-2-2 [V position] + ENTER.
AdjusttheVerticalpositionwith◄►+ENTER.
4-2-3 [H size] + ENTER.
AdjusttheHorizontalsizewith◄►+ENTER.
4-2-4 [V size] + ENTER.
AdjusttheVerticalsizewith◄►+ENTER.
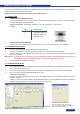
4-3 [Aspect in] + ENTER.
SelecttheAspectRatioofyourinputsourcewith◄►+ENTER.
• [4/3 standard] : 4/3 input format.
•[16/9letterbox]:Letterboxinputformat.
•[WSanamorphic]:WidescreenAnamorphicinputformat(video)or16/9inputformat(computer).
4-4 [Aspect out] + ENTER.
Selectoneofthefollowingoutputaspectratiowith◄►+ENTER.
• [Standard] : The entire image and the aspect ratio are preserved.
•[Crop]: Theimageiszoomedwithoutdeformationtollthescreen,butsomebordersoftheimage
will be cropped. The aspect ratio is preserved.
•[FullScreen]:Theimageisstretchedtollthescreen.Theaspectratioisnotpreserved.
• [Zoom] : The image can be zoomed, cropped and stretched at your convenience.
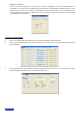
4-5 [Black level] + ENTER.
Adjusttheblacklevelwith◄►+ENTER.
4-6 [Color] + ENTER.
Select a color (Red, Green, or Blue)with◄►+ENTERandadjustthelevelwith◄►+ENTER.
4-7 [Optimize] + ENTER.
Selectanitemwith◄►+ENTER.
• [clock] : Manual adjustment of the pixel clock.
• [phase] : Manual adjustment of the pixel phase.
4-8 [Preset] + ENTER.
This function allows setting all the image parameters to the factory settings. Select [YES] and validate with ENTER.
NOTE : If the selected input is the reference computer input, the available adjustments are : Black level &
Color.
PAGE30