
User Manual
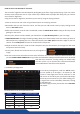


7.3.14 Blending management
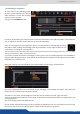
To have access to the blending mana-
gement, you rst need to built, into the
Setup assistant, a screen with mulple
outputs (screens secon)
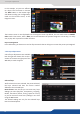
Then go to the secon:
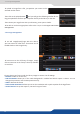
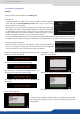
First of all, please adjust your video projectors in the best way thanks to the grid test paern. Remember that
you can adjust the number of lines and rows on the grid test paern.
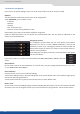
Then, the covering area can be adjusted in pixel in real me thanks to the So Edge centering
test paern. Aer enabling the So Edge centering test paern, simply align the two lines one
on the other, increasing the covering value.
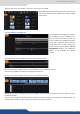
Two lines do not move and two other lines move when you increase the covering value. The aim is to align
exactly the half lines in order to have 2 full lines.
If you don’t see 4 half lines when increasing the covering area, click on the le/right part of your So Edge to
display the blending adjustments. Then disable the blending for the le part then the right part. Your paern
will display the 4 half lines now.
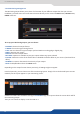
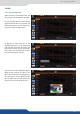
Click on the le/right side into the overview of your So Edge, some sengs will appear. Then adjust the
black levels for each side thanks to the R,G,B level.
The goal here is to have your So Edge area with the same level of black on le, right and center.
Then you will adjust the black area, pixel by pixel. It will delete the last white band that can appear when you
use DLP projectors.
Only the blending needs to be adjusted now:
Click on Enable individual blending in order to acvate the blending curves. You can draw a curve by moving
the 2 points. Do the same for le and right or enable the blending curves symmetry.
Once your covering area is well dened, you need to adjust for le & right, the black levels.