
Instruction Manual


65
8.3.1 Source Input selecon
8.3
Same as Mixer mode
Same as Mixer mode
Same as Mixer mode
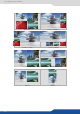
Layer A Layer B
Posion YES YES
Size YES YES
Zoom YES YES
Transparency YES YES
Border YES YES
Opening eects YES YES
Closing eects YES YES
Smooth Move YES YES
H Flip / V Flip YES YES
The layers are used in the same way as the Mixer mode. A source has to be selected to acvate the PIP set-
ngs. Each layer has its own sengs, Layer A on Output #1 is not linked to Layer A on Output #2 in terms of
sengs.
All layers sengs are available in the Layer menu once the layer is selected.
NOTE: Take a look at the blinking of the Matrix mode buon to always know on which output you are working
on.
Same as Mixer mode.
NOTE: If you want to use HDCP content from your sources, be sure to plug HDCP compliant screens or
projectors. If it’s not the case, the output image could be disabled.
To set up the outputs, go in the Output #1 or Output #2 menu and choose rst the appropriate format/reso-
luon and then the adapted rate for your screens by using the knob buon and the ENTER buon.
Output# > Output Format > Output rate
You can also in the Output #2 menu, synchronise all the changes from the Output #1 to the Output #2 by
checking the case Synch w/Out 1. It allows you to set up both outputs at the same me.
Try to use the nave resoluon of your screens/projectors in order to obtain the best image quality.