
User guide


Pressing the [MENU] button in the menu section of the Di-VentiX II, will display and give you access
to the following items on the menu VFD screen:
- MODE: choose which mode the Di-VentiX II will work in, Mixer Mode, Embedded SEB Mode:
or Sync Matrix Mode (see Di-VentiX II modes p.6).
- INPUT: congure the 8 individual input types and resolutions.
- OUTPUT: set the output types and resolutions of the «Main» and «Preview» outputs.
- VIDEO OUT: (optional with OPT-8044VO) congure optional video output settings.
- PRESET: select to access User Preset conguration.
- IMAGE: access image adjustments and optimization.
- LAYER: access layer functions.
- KEYING / TITLING: access the Keying/Titling conguration
- LOGO/FRAME: memorize logos/frames and access logo/frame settings.
- AUDIO (optional with OPT-iX-A): access audio output conguration.
- SOFT EDGE: access Soft Edge Blending controls and adjustments (Soft Edge Mode only).
- CONTROL: setup remote controls, RCS software, LAN setup and hardware updates.
- CONSOLE (optional with RKD8044-T): access optional RKD8044-T setup.
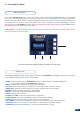
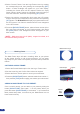
To access the Di-VentiX II menu, in the menu section, simply press the [EXIT/MENU] button (1). To highlight
items in the menu which will appear on the VFD screen (4), turn the corresponding knob (2) left or right to the
desired menu item. When you have reached the desired menu item, press the corresponding [SET] button (3)
to access that menu function. Pressing the [SET] button when a selection has been made sets the value to
that selection in the Di-VentiX II memory. When all settings have been made, press the [EXIT/MENU] button
to exit sub-menus and return to the main menu.
* IMPORTANT * : simply selecting a menu item will not set it to that value. Be sure to press the [SET] button
when parametering the menu items.
4-2. THE DI-VENTIX II MENU
Menu navigation
Home menu
29
The menu will loop through the following screens once turned on.
3
14 2