
Specifications


SECTION 5 INSTALLATION
23
SECTION 5 - INSTALLATION
UNIT SELECTION
Each SMC40 can be set to 1 of 10 possible unit numbers. This can be changed by turning the unit
address switch to the appropriate position. Refer to Section 2, Figure 1 for location assistance.
BAUD RATE SELECTION
The Baud Rate is the transfer rate of the serial communications. This is how fast the ASCII Data is sent
over the transfer lines. The number specifies the number of bits that are sent per second. With a baud
rate of 9600, 9600 bits of information are sent in one second. For standard communications (like the
SMC40), there is one start bit, one stop bit, and 8 data bits. This means that for every ASCII Character 10
bits are sent, so for the 9600 Baud Rate, 960 ASCII Characters will be sent every second. The Baud Rate
is selected by adjusting the Baud Rate Rotary Switch. This switch not only determines the baud rate, but
also sets the parameter RTS, for communication with your computer. Table 6 shows the position of the
switch for the corresponding baud rates. If you are not sure if your computer uses RTS, select RTS ON.
Most computers will work with either RTS ON or OFF.
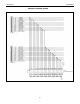
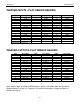
Baud Rate - the baud rate is set externally by a rotary switch.
BAUD RATE SWITCH POSITION
50
300
1200
2400
4800
9600
19200
38400
RTS ON
0
1
2
3
4
5
6
7
RTS OFF
8
9
A
B
C
D
E
F
TABLE 5: Baud Rate Switch
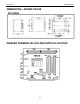
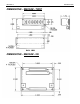
INSTALLATION – MOUNTING OPTIONS
When installing the Driver Pack, make sure there is adequate space for ventilation. Airflow is necessary
to maintain normal operating temperatures for the electronics inside. The Driver Pack should never reach
a temperature over 60 degrees Celsius. Do not block or cover the vents on the Driver Pack. Two different
methods of fastening the Driver Pack are available: bottom and top mounting.
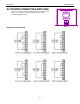
Bottom Mount:
The Driver Pack can be fastened from behind the mounting surface by using four #10-32 x
3
/
8
" screws.
Top Mount:
The Driver Pack has mounting flanges on the left and right sides which permits fastening from the top.
Each flange consist of two slots and a hole. All four slots can be used to mount the Driver Pack from the
front. For easy access mounting, use two slots on one side to slide the Driver Pack into place and then
secure it using the hole on the opposite side.