
Wall Docking Station Operation/Reference Guide


MVP-WDS Wall Docking Station & CB-MVPWDS Conduit Box
4
MVP-WDS Wall Docking Station for MVP Panels
Installation
MVP-WDS wall-docking stations can be installed either the CB-MVPWDS or other solid surface
environment using one of the two mounting options: drywall clips or solid surface screws, as described
in the following sub-sections.
Installing the CB-MVPWDS Conduit Box
The CB-MVPWDS (FG037-10) is a metallic conduit box that can be secured to a stud in a pre-wall
setting. The MVP-WDS can then installed into the conduit box.
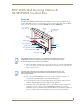
When mounting the conduit box, the MVP-WDS Mounting Tabs must lie flush against the outside of the
sheetrock (FIG. 3).
Refer to installation diagram SP-5965-02 for detailed installation dimensions.
It is recommended that you cut out the surface slightly smaller than what is outlined in the
installation drawings so that you can make any necessary cutout adjustments.
The CB-MVPWDS can be installed with the removable access panel positioned either on top
or bottom. The access panel provides convenient access to in-wall wiring and must be re-
installed prior to mounting the MVP-WDS.
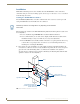
1. Place the left side of the Conduit Box on a stud, making sure that five Stud Fastening Holes and
removable Access Panel are oriented correctly (installation dependant). Be sure to leave enough of a
gap between the stud and Mounting Tabs to accommodate the installation of the drywall or
sheetrock after the conduit box has been mounted. Ultimately, the Mounting Tabs should lie flush
against the outside of the sheetrock (FIG. 3).
Installation procedures and configurations vary depending on the installation
environment.
FIG. 3 CB-MVPWDS conduit box components
Stud
Drywall or sheetrock
MVP-WDS mounting tabs
Wiring knockouts
Stud Fastening Holes
(5 located on left panel)
(right side of conduit box)
(should lie flush against the
outside of the wall)
Removable Access Panel