
Specifications


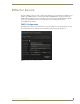


Table Of Contents
- Vision2 Operation/Reference Guide
- Table of Contents
- Overview
- Wiring and Device Connections
- Installation
- Accessing Servers
- Master Service
- Live (MPEG) Service
- Live (WMV) Service
- Reflector Service
- DVB Service
- Archive Service
- Thumbnail Editor
- Thumbnail Viewer
- Producer Service
- Record Service

Live (WMV) Service
72
Vision
2
Operation/Reference Guide
Perform these steps to configure the AMX Vision
2
Dual Encoder:
1. Select Configure Encoder from the WMV Encoder menu. The Configure Live WMV Service page
opens (FIG. 68).
2. In the Service Name text box, enter the name of the service as you want it to appear in the left pane of the
main window.
3. Click Apply.
4. Select the type of encoder you want to configure from the Encoder Type options menu.
5. Click Apply.
6. Use the Encoder Input options menu to indicate whether you are connecting to the S-video, component,
or composite port on the encoder.
7. Use the Encoder Format options menu to indicate which video standard the encoder is using.
8. Use the Encoder Profile options menu to select a profile containing the appropriate pre-configured
encoder settings.
9. Click Apply. Clicking Apply saves your configuration.
10. Check the Encoder Enable check box to start the encoder and unicast the video stream at the selected
settings. You can view the encoded stream by clicking View Unicast Stream in the main menu (FIG. 72).
Configuring the VBrick WMV Appliance Encoder
When you select Configure Encoder from the WMV Encoder menu and select VBRICK WMV Appliance
from the Encoder Type menu, the following page appears (FIG. 69):
FIG. 69 Configure VBrick WMV Appliance Encoder