
Technical information

Management Page
84
RMS - Administrator’s Guide
Once the user’s information is in place, select the Save button to complete the addition.
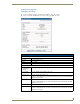
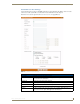
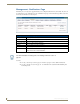
Edit User Page
The fields on the Edit User page match those of the Create New User Account page (see FIG. 78 on page 83).
Any changes needed to be made to a preexisting user must be made in the Edit User page.
Once the user’s information is in place, select the Save button to complete the changes.
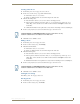
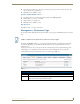
Creating a New User
1.
In the Management - Users page, select Create New User.
2. In the Create New User Account Page (FIG. 78 on page 83), provide the following required information,
Username, Password, Password Confirmation, First Name, and Last Name.
3. Account Enabled must be checked for the user to become active.
4. Provide any pertinent contact information, e.g., Mobile Phone and Fax.
5. If desired, provide the RMS application with a default email or pager number for sending system
notifications.
6. Set the Notification Time Span; your choices are Disable Notifications, Always Send Notifications, and
Only Send Notification On parameter.
7. Click Save to save, Cancel to cancel.
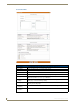
Editing Users
1.
In the Management - Users page, select Edit.
2. In the Edit User Page, edit the following required information, Username, Password, Password
Confirmation, First Name, and Last Name.
3. Account Enabled must be checked for the user to be active.
4. Provide any pertinent contact information, e.g., Mobile Phone and Fax.
5. If desired, provide the RMS application with a default email or pager number for sending system
notifications.
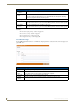
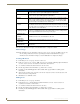
Create New User Account Page (Cont.)
• Mobile Phone The mobile phone number of the user. This value is not used by the RMS application;
it is only used for reference by the RMS application administrators.
• Fax The FAX number of the user. This value is not used by the RMS application; it is only
used for reference by the RMS application administrators.
• Email 1 The primary email account for this user if no other account is specified. This address
will be used for notification emails. Set it as the default from the drop-down combo
box to the right of the field. Send a test notification to the account by pushing Test.
You can enter up to 100 characters for an email address.
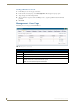
• Email 2, Email 3,
Email 4
These are the secondary email accounts for this user. These addresses will be used
for notification emails. Set it as the default from the drop-down combo box to the right
of the field. Send a test notification to the account by pushing Test. You can enter up
to 100 characters for an email address.
• Pager Provider
and Pager Number
These are the pager setting for SNPP. Enter a pager number and select the pager
provider for your alphanumeric pager. This number will be used for sending notifica-
tion messages. Test will send a test message to this pager.
• Notification Time
Span:
Disable
Notifications
The RMS server does not send notifications to this user.
Always Send
Notifications
The RMS server sends all notifications as they occur to this user.
Only Send
Notification On:
The RMS server sends all notifications but only on the selected days and within the
selected times.