
Technical information


RMS Dashboard Page
55
RMS - Administrator’s Guide
RMS Dashboard Page
Overview
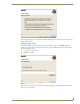
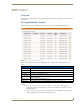
The RMS Dashboard page is the initial page viewed when you log into the RMS application (FIG. 57).
In addition to the navigation menu, the Dashboard is comprised of two columns, arranged and populated by
user defined information.
By default the RMS Dashboard contains the Hotlist (RMS Hotlist section on page 57), Calendar and Room
Status.
How Do You Change Modes?
The mode selection links are located at the top right of the RMS Dashboard. Change modes by clicking one of
the following:
Browse - The default mode for the RMS Dashboard.
Catalog - Add items to the RMS Dashboard.
Edit - Move RMS Dashboard items around the page.
Adding Contents
To add a content item to the RMS Dashboard:
1. Click the RMS Dashboard link in the menu on the left of the RMS application.
2. Click Catalog in the modes on the top right of the page.
3. Select one of the links, Add Contents, Restore Contents or Imported Web Part Catalog.
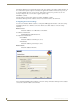
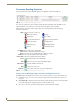
Add Contents
The Add Contents section is a list of predefined Web Part definition files.
1. Place a check in the box next to the items you want to add to the Dashboard.
Select the column within which you want the content displayed.
2. Click Add.
3. Click Close.
FIG. 57 RMS Dashboard