
Technical information

RMS Touch Panel Pages
184
RMS - Administrator’s Guide
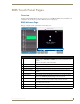
RMS Meeting Request Dialog
When scheduling a meeting at the Welcome panel, it is necessary to provide the scheduler with information
and parameters for the meeting. Meetings scheduled at the panel are non-repeating meetings only. Touch the
fields to select them.
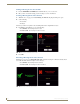
Finding a Meeting In a Room’s Schedule
1.
Press the EARLIER and LATER buttons within the Meeting room schedule area.
2. Once you have located the meeting, press the meeting to see more information.
Creating a Meeting At The Welcome Panel
1.
Within the Welcome page, press Create Meeting. The RMS Meeting Request dialog box opens.
2. Set the following:
Duration
Subject
The Message field is not required for the scheduling troller but is a helpful field for users.
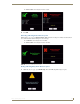
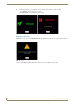
3. Press Reserve. You will then see one of the following:
Confirmed - the meeting has been created.
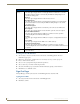
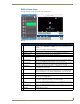
FIG. 165 RMS Meeting Request Dialog
RMS Meeting Request Dialog
• Start Date The start date for the meeting reservation.
• Start Time The start time for the meeting reservation.
• Duration The length of time the meeting reservation is to run; press the + and - buttons to add and remove
time respectively.
• Subject Subject field for the meeting reservation. The subject is displayed in the scheduling information.
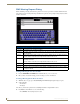
Touch the field to select and use the keyboard a the bottom of the screen.
• Message Message field for the meeting reservation. The message is displayed on the panel and part of the
scheduling information.
Touch the field to select and use the keyboard a the bottom of the screen.
• Keyboard QWERTY keyboard for inputting text in designated fields.
• Cancel Exits the Reserve Meeting dialog without creating a meeting.
• Reserve Places the request for meeting reservation with the scheduling troller. In the event of a conflict,
the request is denied.