
Technical information

RMS User Page
180
RMS - Administrator’s Guide
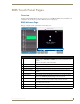
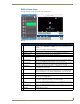
Setting Scheduling View Hours
1.
Select Settings > Preferences in the menu on the left side of the RMS application. The Preferences page
opens.
2. Select the block of hours from the drop down menu,
3. Click Save to save the setting.
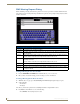
User Profile Page
The User Profile page allows the user to change personal information and designate how the RMS application
interacts with them.
Editing Your User Profile
1.
Select Settings > Profile in the menu on the left side of the RMS application. The User Profile page
opens.
2. Change any of the fields but be sure to include all of the required information.
3. Click Save to save the setting.
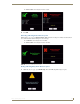
Changing Your User Password
1.
Select Settings > Profile in the menu on the left side of the RMS application. The User Profile page
opens.
2. Click the Profile tab at the top of the page.
User Profile
• Username: This is your username in relation to logging into RMS. This value is required.
• Account Enabled: When this box is checked, a user is valid and can log into RMS.
• Password: This is the password associated with your user account, used at the time of
login. This value is required.
• Confirm Password: Retype password for confirmation. This value is required.
• First Name: The first name of the user assigned to this account. This value is required.
• Last Name: The last name of the user assigned to this account. This value is required.
• Phone User’s phone number.
• Mobile Phone: User’s mobile phone number.
• Fax: User’s fax number.
• Email 1,Email 2,
Email 3, Email 4:
User’s email address. The drop down menu allows you designate the email
address as the default account, send a plain text message, HTML message, or
Pager Message.
Test sends a message to the email address.
When established, RMS will use the account to send notifications.
You can enter up to 100 characters for an email address.
• Pager Provider: A drop down list of pager providers. This option is only available if the RMS
server has been configured to use Simple Network Paging Protocol (SNPP).
• Pager Number: The number for contacting the pager with notifications.
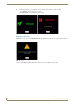
Notification Time Span:
Disable Notifications When selected, notifications are not sent to this user.
Always Send Notifications When selected, all notifications are sent to this user.
Only Send Notifications On: The RMS server will send notification only within the designated parameters.
Place a check in the box next to the days of the week you would like to receive
notifications.
Start Time/End Time - The three drop down menus represent hour, minute and
designation for ante-meridiem vs. post-meridiem (AM/PM), in that order.
Notifications are only sent between the start and end times.