
Technical information
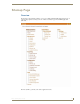


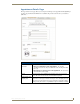

RMS Scheduling Page
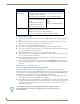
176
RMS - Administrator’s Guide
Creating an Appointment
1.
Select Add Appointment in the menu on the left side of the RMS application. The Add Appointment page
opens.
2. In the drop down menu, Room, select the room that will host the appointment or search for a room by
clicking Search (See Conducting a Room Search section on page 178).
3. Type a Subject for the appointment in the space provided.
4. Type a Message providing more information about the appointment in the larger text field.
5. Set the Appointment Times, start, end and if it is a recurring appointment. If the appointment is recurring,
set the Pattern and Lifetime of the appointment.
6. Click the RMS Appointment Details tab to access the Appointment Details page.
7. Set the Automation Control, if applicable, to set the preset to execute manually or automatically. Select
the Control Event from the drop-down menu.
8. Enter display text in the lines provided. These lines of text appear on the panels in the room at the time of
the appointment. This step is optional.
9. Select a panel display image from the drop-down menu, or click Upload Image. If you selected Upload
Image, either type the path or browse to the file you wish to use. Click Upload to load the file. This step
is optional.
10. Click Save to save, or Cancel to cancel.
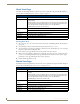
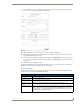
Creating an Appointment with an External Scheduler
When used in conjunction with an external scheduling system, e.g., Lotus Notes, RMS must check the
scheduling system for changes and updates. RMS utilizes a trolling engine to log into the external scheduling
system, check for new and updated appointments, and then sync those appointments within the RMS database.
All detected changes can then become notifications RMS sends to designated users.
1. Within your external scheduler, e.g., Lotus Notes and Outlook, create a meeting (appointment). Your
room selection is made at this time within the external scheduler.
2. Once RMS has detected the new appointment, an email notification is sent to the appointment scheduler
(see FIG. 163). Click on the provided Appointment URL to set presets, welcome messages, and welcome
images in the Add Appointment page. See the Add Appointment Page section on page 173 for more
details on the page opened.
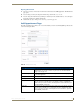
Appointment Details (Cont.)
• Panel Display Image
Display Image RMS supports custom image display for assisting in informing your attendees.
The following formats are supported:
Note: This feature is only available if a G4 panel is available for display.
• BMP (Microsoft Windows Bitmap)
• JPG (Joint Photographics Experts
Group)
• PNG (Portable Network Format)
• ICO (Microsoft Windows Icon)
• TIF (Tagged Image File Format)
•TGA
•PCX
•WBMP
WMF (Microsoft Windows Metafile)
Upload an Image Clicking this link enables the file upload area of the page.
• Browse... - Opens the file browse window.
• Upload - Loads the image file to the appointment.
This feature is only available if a G4 panel is available for display.
The Add Appointment Page disables the Appointment Details, Appointment Times,
and Recurring features, these parts of the appointment can only be changed in the
external scheduler.