
Technical information


Configuration Page
153
RMS - Administrator’s Guide
Configuration Page
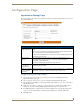
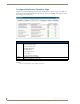
Appointment Settings Page
These settings allow you to set the master appointment modification password and the number of days to retain
appointments (FIG. 153).
Configuring The System Storage Settings
1.
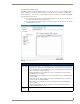
Select Configuration > Appointments in the menu on the left side of the RMS application. The
Appointment Settings page opens.
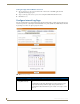
2. Type to set the Appointment master password. Leaving this field blank disables this feature.
3. Type the number of days RMS is to retain the appointment in the field Remove after: (Days). The value of
0 disables this feature.
4. Enable Prevent scheduling of conflicting appointments by placing a check in the box. If this feature is
disabled, it is possible to schedule multiple appointments for the same room at the same time.
5. If the RMS application is configured using an external scheduling source, selecting Add Appointment
redirects you to the webmail interface defined in this field. Click Test to confirm the URL works.
6. Click Save to save.
FIG. 153 Appointment Settings Page
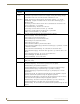
Appointment Settings
• Appointment
Master Password
A password used to help users who forget individual appointment modification pass-
words.
• If a user enters a password for an appointment and then forgets it, this password can
be entered and used to clear the appointment password.
• If this password is left blank, there is no master password for modifying appointments.
The default password is 1988.
• Remove After
(Days)
This is the number of days appointments are held in the RMS application system.
• The default value of 90 days allow users to browse past appointment while
minimizing storage requirements.
• To disable deleting of past appointments, set this value to 0.
• Prevent scheduling
of conflicting
appointments
When checked, the RMS application will not permit the scheduling of more than one
appointment at the same time.
• External scheduling
system webmail
hyperlink
If the RMS application is configured using an external scheduling source, selecting Add
Appointment redirects you to the webmail interface defined in this field.