
Technical information


RMS Resource Management Suite
4
RMS - Administrator’s Guide
Network Configuration
The RMS application is a client/server application where the NetLinx system acts as the client and the RMS
application server listens for connections from NetLinx systems. NetLinx and the RMS application server
communicate using TCP/IP sockets. In order to establish communication, each NetLinx system must be able
to resolve and connect to the RMS application server. This can be accomplished with a variety of Network
configurations including local area networks (LAN), wide area networks (WAN), and the Internet.
In order to communicate with the RMS application, a NetLinx system must have the RMS modules added to
its programming by a qualified NetLinx programmer. The RMS application module includes the core API and
communication stack that allows NetLinx to communicate with the RMS application.
Since each NetLinx system acts as the client, it must be configured to communicate to the RMS application
server using the 'SERVER-' command in NetLinx programming. NetLinx can accept either an IP address or a
HostName for the server. NetLinx supports DNS so if you are using a HostName, the HostName must be
registered with the DNS server that NetLinx has been configured to use. The DNS server configuration will be
picked up automatically through DHCP if the DNS servers are registered with the DHCP server. For more
information on configuring DNS servers in NetLinx, see the NetLinx master’s instruction manual.
Optionally, the server IP or host name can be placed in a file called ServerInfo.txt and placed in the RMS
directory of the NetLinx master's file system. If this file is present, the RMS communication module ignores
the SERVER- command and uses the address supplied in the file. Enter the IP address or hostname on a single
line using a text editor and FTP the file to the NetLinx master. If the RMS directory does not exist, you can
create it and place the file in the directory.
By default, NetLinx and the RMS application communicate using TCP/IP port 3839. Port 3839 is registered to
AMX Resource Management Suite with IANA (http://www.iana.org/assignments/port-numbers). This can be
changed to suit your particular facility, but it must be changed in both the RMS server software and each
NetLinx system. In the RMS server, this is accomplished through the Configuration Wizard. In NetLinx, this is
accomplished through the 'SERVER-' command in NetLinx programming. If using the ServerInfo.txt file,
append a ":" and the port number to the server IP address or host name.
Once a NetLinx system has been programmed with the RMS modules and the server's IP address or
HostName, the NetLinx system automatically connects to the RMS server.
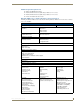
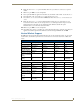
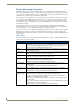
RMS Application Install Checklist
Use the RMS Application Install Checklist to aid your installation.
RMS Application Install Checklist
Is the RMS server's host name registered with your DNS server?
Yes • Configure each NetLinx system to point to the correct DNS server and obtain the HostName from the
network Administrator to use in the 'SERVER-' command.
The DNS server configuration will be picked up automatically through DHCP if the DNS servers are
registered with the DHCP server.
Note: To verify your NetLinx system can resolve the DNS name of the RMS server, connect to the
NetLinx master using TELNET and use the PING command to determine if the RMS server DNS name
can be resolved.
No • Determine the IP address of the RMS server from the network Administrator to use in the 'SERVER-'
command.
Do you want to use 3839 as the TCP/IP port for communications between NetLinx and the
RMS server?
Yes • No changes need to be made in either RMS or NetLinx.
No • Configure the TCP/IP in the RMS server using the Configuration Wizard and supply the new port to the
NetLinx programmer to use in the 'SERVER-' command.