
Specifications


Installation
5
RADIA Lighting Control System
Installation
Space Requirements
AMX Lighting control installations require very little space. Enclosures are the main concern. All enclosures
are mounted flush, on a vertical surface and must have a minimum clearance of 12" (304.8 mm) above and
below to allow for air circulation. Physical dimensions for each enclosure are described in the Installation
section.
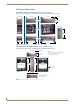
Conduit
Conduit runs depend on the enclosures you use and their AMX Lighting modules. All enclosures have conduit
knockouts on the top for high-voltage connections, and knockouts on the bottom for low-voltage connections.
All conduit knockouts allow for 1/2, 3/4, and 1-inch (12.7 mm, 19.0 mm, and 25.4 mm) conduits as shown in
FIG. 3. You should also consider these recommendations prior to installing enclosures:
Install separate conduit for lighting loads. The recommended knockout for loads is located on the
top center of the enclosure.
Install separate conduit for the 120 VAC wiring to the line input terminal block. The recommended
knockouts for incoming power feeds are located on the top-left and top-right sides of the AMX
Lighting enclosure.
Install separate conduit for low-voltage signals for dry closures, AxLink, and PROlink connections. The
recommended knockout for these control connections is located on the bottom of the enclosure. There are
additional knockouts on the bottom-left and bottom-right sides of the enclosures for alternate low-voltage
connections.
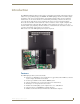
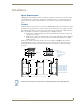
FIG. 3 Knockout locations (RDA-ENC2 used as example)
TOP
BOTTOM
LEFT SIDE FRONT RIGHT SIDE
B
A
C
A
C
A
E G
F
A
E
D
D
Knockout
Knockout
Knockout
Knockout
Knockout
Knockout
A = 3.94" (100.0 mm)
B = 6.03" (153.1 mm)
C = 3.00" (76.2 mm)
D = 1.00" (25.4 mm)
E = 9.75" (24.76 cm)
F = 6.00" (15.24 cm)
G = 11.90" (30.22 cm)
All knockouts
are for 1/2" (1.26 cm),
3/4" (1.90 cm), and
1" (2.54 cm)
conduit
Install the control modules according to local and National Electrical Code (NEC) regulations.