Operation/Reference Guide MIO R-1 AUDIO Tango Distributed Audio Remote Control Distributed Audio Initial Release: 2/19/2008
AMX Limited Warranty and Disclaimer This Limited Warranty and Disclaimer extends only to products purchased directly from AMX or an AMX Authorized Partner which include AMX Dealers, Distributors, VIP’s or other AMX authorized entity.
Table of Contents Table of Contents Overview ............................................................................................................1 Specifications............................................................................................................ 2 Touch And Tilt Sensor............................................................................................... 2 MIO R-1 AUDIO Setup ........................................................................................
Table of Contents Satellite and Other ....................................................................................................... 17 Custom XM ................................................................................................................... 18 Direct Numeric Access ........................................................................................... 18 Tuners.................................................................................................................
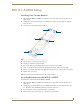
Overview Overview The MIO R-1 AUDIO (FG147-04) remote provides custom control features, contained in an elegant handheld device, designed specifically for use with Matrix Distributed Audio Systems using Metreau DAS-MET-6SRC and/or DAS-MET-NUM keypads. The MIO R-1 AUDIO (FIG. 1) controls 6 different device modes, supports 3 macro functions and is capable of executing 219 functions. Selecting a source device sends a command to the master and runs predetermined events associated with that source.
Overview Specifications The MIO R-1 AUDIO device specifications are as follows: MIO R-1 AUDIO Specifications Power Requirements: 4 AAA Alkaline Batteries (included) - approx. 5 hours battery life Transmission Frequencies AMX 38 KHz/455 KHz IR Transmission Range (distance) with MIO IR Receiver • 100 feet at 38KHz Transmission Range (angle) • 140 degrees (+/-70° from perpendicular) horizontally from an axis extending from the end of the remote. Note: The Metreau MET-6N keypads only support 38 KHz.
MIO R-1 AUDIO Setup MIO R-1 AUDIO Setup Installing Your Custom Buttons 1. Flip and turn the MIO R-1 AUDIO so that the buttons are facing away from you and the device is upside down. 2. Holding the device in both hands, place your thumbs on the battery door and push up to slide the battery door free. 3. Unscrew the 6 screw points indicated in FIG. 2. 1 4 2 5 3 6 FIG. 2 6 screwpoints (battery compartment cover removed) 4. Turn the unit over so the buttons are facing you. 5.
MIO R-1 AUDIO Setup Battery Low Indicator When the battery charge level is too low to sustain continuous operation, the LCD flashes, "Battery Low" and the device shuts down.
Programming The MIO R-1 AUDIO Programming The MIO R-1 AUDIO Most functionality of the MIO R-1 AUDIO is handled using the application KeypadBuilder. Go to www.amx.com for the KeypadBuilder Instruction Manual. The MIO R-1 AUDIO recognizes a select number of Serial Commands. For a full list and descriptions, consult Persistent Serial Commands section on page 10. Using Connector Ports on The MIO R-1 AUDIO The programming jack is used for communication between the device and KeypadBuilder.
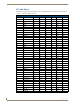
Programming The MIO R-1 AUDIO IR Code Matrix The IR Code emitted depends upon which of the 6 configurable modes is selected. Below is the list of codes for each button within each mode.
Programming The MIO R-1 AUDIO IR Code Matrix (Cont.) Button Label Mode 1 Mode 2 Mode 3 Mode 4 Mode 5 Mode 6 41 S. REV Z 7 47 87 127 167 207 42 PLAY A 1 41 81 121 161 201 43 S.
Programming The MIO R-1 AUDIO Debug Mode Pressing button "4" on the remote toggles development mode between ON and OFF. The display indicates the selected mode. In development mode, the display shows the IR code assigned to buttons when pressed. This mode is useful to the programmer when determining what IR codes are associated to each mode. Battery Type Pressing button "6" on the remote toggles the battery type between Normal and Recharge. The display indicates the selected type.
Programming The MIO R-1 AUDIO Updating MIO R-1 AUDIO Firmware Updating firmware in the MIO R-1 AUDIO is also done through the programming jack. To update the main firmware for the MIO R-1 AUDIO: 1. Connect the MIO R-1 AUDIO to your computer via the programming jack (FIG. 3). 2. Put the device into Download mode, as shown on page 7. 3. Open NetLinx Studio. 4. Set the Master Communication Settings to Axcess Master and set the baud rate to 115200. 5. Go to Tools > Firmware Transfers > Send to Axcess Device..
Programming The MIO R-1 AUDIO Persistent Serial Commands There are a select number of persistent commands the MIO R-1 AUDIO recognizes. Establish a HyperTerminal session with your device to use the following commands: Serial Commands @BRT Set Brightness level Syntax: "'BRIT-,'" Variables: brightness level # = a value from 0 - 32.
MIO Remote Charging Base MIO Remote Charging Base The MIO remotes are complemented either with a MIO-RCC charging base (FG147-02) or the MIO-RCC rechargeable upgrade kit (FG147-03K). One charging base, a new back housing and a MIO-RBP rechargeable lithium ion battery (FG147-10) are included with the rechargeable upgrade kit. The charging base upgrade kit transforms the MIO R-1, R-2 and R-3 into a rechargeable device.
MIO Remote Charging Base The specifications for the MIO remote charging base and kit are as follows: MIO-RCC Remote Charging Kit (FG147-03K) with Base (FG147-02) Specifications Dimensions (HWD) Charging Base - 1.61 (4.09 cm) (height); 4.25 (10.80 cm) (diameter) Lithium Ion Battery - 2.13” x 1.38” x .28” (5.41 cm x 3.45 cm x .71 cm) Weight • 1.15 lbs (.52 kg) - Remote Charging Cradle • .15 lbs (.07 kg) - Power Supply • .06 lbs (.
MIO Remote Charging Base 5. Remove the back housing. 6. Place the new housing on the device so that the rechargeable battery port connection is now accessible. See FIG. 8. 7. Replace the 6 screws. 8. Connect the terminal end of the Lithium-Ion battery to the port shown in FIG. 8. It may be necessary to use a thin, blunt object to fully seat the battery connector within its port. Lithium Ion Battery Rechargeable Battery Port Connection FIG. 8 Rechargeable Battery Port on The MIO Remote 9.
MIO Remote Charging Base Changing Battery Modes Configuration Mode The Configuration mode allows you to set the battery type. To enter Configuration mode: 1. Press and hold the STOP button and the INPUT button simultaneously. The two buttons must be pressed within 0.1 seconds of each other and held down for 2 seconds. The device indicates you are now in Configuration mode. Battery Type 2. Pressing button 6 on the remote toggles the battery type between Normal and Recharge.
Using the MIO R-1 AUDIO Remote Using the MIO R-1 AUDIO Remote Tone Control & SRS Setting To access the Tone Control and SRS settings, press the TONE button (FIG. 1). This enables the Tone Control Mode with BASS as the first mode selected. TONE button FIG.
Using the MIO R-1 AUDIO Remote Privacy Mode When the privacy feature is engaged, the room/zone cannot be paged, apart from this, the room/zone will function normally. To use the privacy feature in a specific zone, the keypad must be OFF (no sources selected) To engage Privacy mode, press the Privacy (PRIV) button. To disengage, press any Source or Navigation button. Privacy (PRIV) button FIG.
Using the MIO R-1 AUDIO Remote Pressing Source Buttons switches between sources and turns the Source On, but does not toggle between ON and OFF. Source Control NAV Up NAV Center NAV Left NAV Right NAV Down FIG.
Using the MIO R-1 AUDIO Remote Custom XM NAV Button CUSTOM XM NAV Up UP NAV Down DOWN NAV Left LEFT NAV Right RIGHT NAV Center (press) CENTRE NAV Center (press/hold) CEN hold Direct Numeric Access "Dot" button ENTER button FIG. 6 Direct Numeric Access buttons Tuners Enter the station identification and press ENTER. Strings of 3 to 4 numbers are recognized. If a " • " (dot) is part of the string, then an FM station is assumed, otherwise an AM station is assumed.
Using the MIO R-1 AUDIO Remote Presets Preset (PSET) button FIG. 7 Preset (PSET) button Creating a Preset 1. 2. 3. 4. 5. Select the source. Direct Tune to the station of choice (enter station ID + ENTER). Select the "PSET" button. Key in the preset number (1 - 10). Press & Hold ENTER. Example: Tune to 1050AM; press PSET; 5 + press/hold ENTER (stores 1050AM as preset #5). Recalling a Preset 1. 2. 3. 4. Select the source Press the "PSET" button. Key in the preset # (1 - 10). Press ENTER.
Using the MIO R-1 AUDIO Remote Zone Grouping In this state, zones can be "grouped" together and controlled as a single zone. Press the "GRP" button to enter "Group Mode". Group (GRP) button FIG. 8 Group (GRP) button Adding a Zone To a Group 1. Press the "GRP" button to enter "Group Mode". 2. Key in zone # to add to group. 3. Press ENTER (to exit Group Mode). The zone from which zone grouping is being administered, is assumed to be the 1st zone in the grouping.
Using the MIO R-1 AUDIO Remote Favorites One "favorite" can be programmed for each Source, in each Zone. If a "favorite" is set for a specific source in a specific zone, when that source is turned on (after System has been OFF), the favorite will begin playing in that zone. Favorite (FAV) button FIG. 9 Favorite (FAV) button Favorites can only be set for Sources that utilize "Direct Access" functionality. Creating A favorite For A Specific Source 1. 2. 3. 4. Select Source. Key in a direct entry string.
Using the MIO R-1 AUDIO Remote Alarm When the alarm time is reached, the source selected will turn ON and the volume will ramp up to the set volume and begin playing. At this point the source will behave normally. Alarm (ALRM) button FIG. 10 Alarm (ALRM) button If a favorite has been set, the favorite will begin playing, else, the last station/CD will begin playing. To use the Alarm feature, a System Time must first be entered on the Main Controller, via the Front Controller LCD. Setting Alarm Time 1.
Using the MIO R-1 AUDIO Remote Keypad Lockout Lockout (LOCK) button FIG. 11 Lockout (LOCK) button Locking A Specific Keypad 1. Press "LOCK" button. 2. Enter the room/zone # to lock. 3. Press ENTER. Unlocking A Specific Keypad 1. Press "LOCK" button. 2. Enter the room/zone # to UNLOCK. 3. Press & Hold ENTER. Examples: Press "LOCK" + 2 + ENTER (keypad in zone #2 will be locked). Press "LOCK" + 4 + ENTER (keypad in zones #2 & #4 will be locked).
Using the MIO R-1 AUDIO Remote 24 MIO R-1 AUDIO
Using the MIO R-1 AUDIO Remote MIO R-1 AUDIO 25
AMX. All rights reserved. AMX and the AMX logo are registered trademarks of AMX. AMX reserves the right to alter specifications without notice at any time. ©2008 2/08 It’s Your World - Take Control™ 3000 RESEARCH DRIVE, RICHARDSON, TX 75082 USA • 800.222.0193 • 469.624.8000 • 469-624-7153 fax • 800.932.6993 technical support • www.amx.