
User Manual


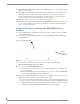
Table Of Contents
- NXR-ZGW/-ZRPNetLinx ZigBee Compatible Gatewayand Repeater
- Overview
- Installation
- Setting up a Network
- NXR-ZGW Browser-based Configuration Manager Pages
- Summary of Gateway Settings
- Configuration
- Personal Area Network (PAN)
- Network
- Enabling and disabling the wireless network
- Setting the PAN channel
- Security
- Access List
- Connections
- Finding a device’s EUI address
- Finding the device’s description
- Determining the device type
- Finding the amount of time a signal takes from the device to the gateway and back
- Determining the device link quality
- Checking the device link status
- PAN Device Details
- Putting a device on the Access List
- Removing a device from the Access List
- Locating the device
- Changing a Connected Device description
- Changing a device’s ZigBee networking information
- Utilities
- Device Configuration

Device Configuration
34
NXR-ZGW/-ZRP
8. Click the Reboot Device checkbox. This causes the NXR-ZGW device to reboot after the firmware
update process is complete.
9. Click Send to begin the transfer. The file transfer progress is indicated on the bottom-right of the
dialog (FIG. 18). Do not pull power from device during transfer, it can take approximately 5
minutes to finalize firmware transfer. The upgrade can still be in progress when the bargraph
reaches the end, it is a good idea to wait until the process is complete.
10. Click Close (after the device reboots) to return to the main program.
11. Right-click the associated System number and select Refresh System. This causes a refresh of all
project systems, establishes a new connection to the Master, and populates the System list with
devices on your particular system.
Using the ID Button to Change the NXR-ZGW’s Device
Number
1. Launch NetLinx Studio 2.4 (default location is Start >Programs > AMX Control Disc > NetLinx
Studio > NetLinx Studio 2.4).
2. Access the Device Addressing dialog (FIG. 19) by selecting Diagnostics > Device Addressing
from the Main menu.
3. Locate the Device field (A in FIG. 19) and enter the new value for the NXR-ZGW.
This value must fall within a range of 0 - 32767.
4. Press the on-screen Start Identify Mode button.
This action causes a previously red *Not Active* field to now display a green Waiting...Press
Cancel to Quit.field.
This green field indicates that Studio is waiting to detect the device value of the NXR-ZGW
associated with the ID button on the target NXR-ZGW.
5. Press the target NXR-ZGW’s ID button to begin process of reading the current device value of the
NXR-ZGW and then assigning it to the new value entered in step 2.
Once the swap has been successfully made, a red Successful Identification Made field appears.
The previous Device value and associated System number of the targeted NXR-ZGW are then
displayed below the red field. As an example, Previous D:S=32002:1, where 32002 was the
previous device value of the NXR-ZGW (D) and 1 was the System value (S).
FIG. 19 Device Addressing dialog (using the ID mode to set the NXR-ZGW device value)
Enter the new NXR-ZGW value
Assign the
new value to
the NXR-ZGW
A
B