
User Manual


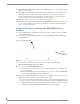
Table Of Contents
- NXR-ZGW/-ZRPNetLinx ZigBee Compatible Gatewayand Repeater
- Overview
- Installation
- Setting up a Network
- NXR-ZGW Browser-based Configuration Manager Pages
- Summary of Gateway Settings
- Configuration
- Personal Area Network (PAN)
- Network
- Enabling and disabling the wireless network
- Setting the PAN channel
- Security
- Access List
- Connections
- Finding a device’s EUI address
- Finding the device’s description
- Determining the device type
- Finding the amount of time a signal takes from the device to the gateway and back
- Determining the device link quality
- Checking the device link status
- PAN Device Details
- Putting a device on the Access List
- Removing a device from the Access List
- Locating the device
- Changing a Connected Device description
- Changing a device’s ZigBee networking information
- Utilities
- Device Configuration

Device Configuration
32
NXR-ZGW/-ZRP
Upgrading The NXR-ZGW via An IP Address
Before beginning this section, verify that your device is powered and connected to the NetLinx Master
through an Ethernet connection.
Preparing the Master for communication via an IP
1.
Obtain the IP Address of the NetLinx Master from your System Administrator. If you do not have
an IP Address for the Master, refer to your particular Master’s instruction manual for more
information on obtaining an IP Address using NetLinx Studio 2.4 or higher.
From the Online Tree tab of the Workspace window, select the NetLinx Master.
Follow steps outlined in either the Obtaining or Assigning the Master’s IP Address sections
from your particular NetLinx Master instruction manual to use an address.
Note the IP Address and Gateway information.
2. Launch NetLinx Studio 2.4 (default location is Start > Programs > AMX Control Disc > NetLinx
Studio > NetLinx Studio 2.4).
3. Select Settings > Master Communication Settings, from the Main menu to open the Master
Communication Settings dialog (FIG. 17).
4. Click the Communications Settings button to open the Communications Settings dialog.
5. Click on the NetLinx Master radio button (from the Platform Selection section) to indicate that you
are working with a NetLinx Master (such as the NXC-ME260 or NI-Series of Integrated
Controllers).
6. Click on the Authentication Required radio box (if the Master is secured) and then enter a
username and password.
7. Click on the TCP/IP radio button (from the Transport Connection Option section) to indicate you
are connecting to the Master through an IP Address.
8. Click the Edit Settings button (on the Communications Settings dialog) to open the TCP/IP Settings
dialog (FIG. 17).
9. Enter the IP Address into the TCP/IP Address field. This information is obtained from either your
System Administrator or obtained from the Master.
10. Click OK three times to close the open dialogs and save your settings.
11. Click Yes to interrupt the current communication from the Master and apply the new settings.
FIG. 17 Assigning Communication Settings and TCP/IP Settings
List of previously saved IP Addresses