NX2200 Series User Guide 2871 Pullman Street, Santa Ana, CA 92705 Phone. 949.486.0320 Fax. 949.486.0333 www.exadigm.
NX2200 User Guide Copyright 2012 ExaDigm, Inc. All Rights Reserved. Printed in USA Warranty The information contained in this document is subject to change without notice. ExaDigm makes no warranty of any kind with regard to this material, including, but not limited to, the implied warranties or merchantability and fitness for a particular purpose.
NX2200 User Guide Table of Contents 1.0 NX2200 Handheld Mobile Terminal ...................................................................... 4 2.0 Accessories, Parts and Peripherals ...................................................................... 4 3.0 Installing the NX2200 ........................................................................................... 4 4.0 Terminal Components .......................................................................................... 5 4.
NX2200 User Guide 1.0 NX2200 Handheld Mobile Terminal The ExaDigm NX2200 terminal supports multiple applications and will communicate with the host via Ethernet, Cellular Modem CDMA or GSM/GPRS and WiFi. 1.1 PCI information: PCI PA-DSS approved payment applications PCI PTS 2.0 approved 1.2 EMV Level 1 and 2 approved 1.3 Modem versions: 1.4 TNW3T23.000 NX2200 CDMA Verizon TNW4T21.
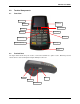
NX2200 User Guide 4.0 Terminal Components 4.1 Front View LED Lights Magnetic Card Reader Screen Up/Down Arrow Power Key Cancel Key Alpha Key Feed Key 2 Programmable Function Keys Enter Key Clear/Backspace Key Smart Card Reader 4.2 Terminal Ports The figure below shows the ports used to connect the terminal to a power source, Ethernet port and various devices such as PIN pads using the multi-port connector. Power 2 USB Ports Ethernet RS-232 Port © 2012 ExaDigm, Inc. Page 5 of 17 Rev.
NX2200 User Guide 5.0 Installing a Paper Roll A paper roll is required to print receipts and reports. The NX2200 uses thermal 2 ¼ x 1.38” paper rolls. Follow the steps below to install a paper roll: 1. Place forefinger under flap at the bottom of the terminal and pull forward using force. 2. Using the tab lift compartment out. 3. Place the paper roll in the printer compartment. 4. Close the printer compartment door by pressing until it clicks into place. 6.
NX2200 User Guide 7.0 SIM Chip Installation Note: SIM chips are only used in GSM/GPRS equipped terminals. 1. The SIM chip slot is located with the terminal face down under the battery compartment. The battery door must be removed by placing your finger on the ridges of the door and sliding down to remove. 2. Remove the battery by placing a finger on the opening and pulling up. The battery will loosen and fall out once the terminal is turned over. 3.
NX2200 User Guide 8.0 Powering Terminal To power on terminal press orange Power key until beep is heard. The boot up process will display. To power down terminal press orange Power key until the message below appears. Press power again to complete process. Press power key again to power off!! Other keys to cancel. 9.0 Card Swipe Swipe card through reader with the magnetic stripe facing down and toward the terminal. 10.
NX2200 User Guide 11.0 Connecting External Readers The multi-purpose USB port allows various devices to be attached and used. You can also attach the multi-purpose attachment to the RS-232 port located on the left side of the terminal. 12.0 Alpha/Numeric Keypad To get a letter press the corresponding number and then the alpha key until the letter is displayed.
NX2200 User Guide 12.1 QWERTY Keyboard To input capital letters press the up arrow [] and press the key. To input symbols press the [?123] key on the touch screen the number and symbol screen will display. Press the [ALT] key for additional characters. To backspace and clear characters use the [DEL X] key or [CLEAR] on the keypad. © 2012 ExaDigm, Inc. Page 10 of 17 Rev.
NX2200 User Guide 13.0 Color-Coded Keys The color-coded keys perform the following tasks: 14.0 Red CANCEL Key: previous menu. Yellow CLEAR Key: character. Green ENTER Key: This key is used like the ENTER key on a computer keyboard. Press the green key to signify to the terminal that the task is complete, or press to enable a function or perform an action based on typed data. Orange Power Key: Press this key to turn on or off the terminal.
NX2200 User Guide 15.1 Managing User Security manager provides the user interface to manage users. To access the user management area, the highest level (manager) credential is required to perform the following operations: Add User Edit User i. Unlock User ii. Change Name iii. Change Pwd iv. Change Role v. Enable/Disable Delete user Print users Managers can add a new user, delete or edit current user or print users list in user management menu. 15.1.
NX2200 User Guide 15.2.5 A user can change their password by following the instructions below: 1. Go to Application Manager 2. Go to Admin 3. Go to User Management 4. Select Change Password 15.2.6 The security manager forces users to change any default password after the first successful login. 15.2.7 The security manager forces users to change any password changed in the user management menu after the first successful login. 15.3 User Rules 15.3.1 Each user has a unique ID.
NX2200 User Guide In order to make sure storage of cardholder and full track data is in the database only when it is actually needed; transaction level controls are added as following: Save Cardholder Data in Database: Cardholder data is saved to database during regular credit transactions. Save Full Track in Database: Full track data is saved to database when store and forward transactions are accepted.
NX2200 User Guide 17.0 Battery and Charger Safety Proper battery and charger safety is necessary to ensure the terminal will perform to its potential and reduce the risk of overheating, igniting or explosion, resulting in serious bodily harm or property damage. Do not disassemble, open, crush, bend, deform, puncture, shred or attempt to modify the battery or charger.
NX2200 User Guide 18.2 Part 68 of FCC Rules This equipment complies with the regulations in Part 68 of the FCC Rules. The FCC registration number and REN (ringer equivalence number) is located on the FCC label located in the back of the terminal. The REN is used to determine the quantity of devices that may be connected to the telephone line. Excessive RENs connected to the telephone line may result in the device not being able to communicate.
NX2200 User Guide Use only the power cord and batteries indicated in this manual. Do not dispose of batteries in a fire. They may explode. Check with local codes for possible special disposal instructions. SAVE THESE INSTRUCTIONS Follow the instructions below for Telephone line cord safety: "CAUTION: To reduce the risk of fire, use only No. 26 AWG or larger (e.g.