
User's Manual


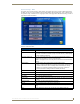
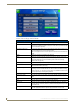


Table Of Contents
- MVP-9000i 9" Modero® ViewPoint® Touch Panel with Intercom
- Introduction
- Accessories
- Configuring Communication
- Overview
- IR Communication
- Modero Setup and System Settings
- Wireless Settings - Wireless Access Overview
- Configuring Wireless Network Access
- Step 1: Configure the Device’s WiFi Settings
- Step 2: Configure the Card’s Wireless Security Settings
- Step 3: Choose a Master Connection Mode
- Ethernet Over USB
- Using G4 Web Control to Interact with a G4 Panel
- Using the NetLinx Master To Control the G4 Panel
- Setup Pages
- Protected Setup Pages
- Upgrading Firmware
- Programming
- Overview
- Animated Transitions
- Touch Gesture Recognition
- Page Commands
- Programming Numbers
- "^" Button Commands
- Text Effects Names
- Button Query Commands
- Panel Runtime Operations
- Input Commands
- Embedded codes
- Panel Setup Commands
- Dynamic Image Commands
- Intercom Commands
- SIP Commands
- ^PHN- AUTOANSWER
- ^PHN-CALL
- ^PHN-DECLINE
- ^PHN-INCOMING
- ^PHN- LINESTATE
- ^PHN- MSGWAITING
- ^PHN-PRIVACY
- ^PHN-REDIAL
- ^PHN- TRANSFERRED
- ^PHN-ANSWER
- ^PHN- AUTOANSWER
- ?PHN- AUTOANSWER
- ^PHN-CALL
- ^PHN-DTMF
- ^PHN-HANGUP
- ^PHN-HOLD
- ?PHN- LINESTATE
- ^PHN-PRIVACY
- ?PHN-PRIVACY
- ^PHN-REDIAL
- ^PHN- TRANSFER
- ^PHN-SETUP- DOMAIN
- ^PHN-SETUP- ENABLE
- ^PHN-SETUP- PASSWORD
- ^PHN-SETUP- PORT
- ^PHN-SETUP- PROXYADDR
- ^PHN-SETUP- STUNADDR
- ^PHN-SETUP- USERNAME
- Battery Life and Replacement
- Appendix A: Text Formatting
- Appendix B: Wireless Technology
- Appendix C: Troubleshooting
- Overview
- Panel Doesn’t Respond To Touches
- Battery Will Not Hold Or Take A Charge
- MVP-9000i Isn’t Appearing In The Online Tree Tab
- MVP Can’t Obtain a DHCP Address
- My AP Doesn’t Seem To Be Working
- NetLinx Studio Only Detects One Of My Connected Masters
- Can’t Connect To a NetLinx Master
- Only One Modero Panel In My System Shows Up
- Panel Behaves Strangely After Downloading A Panel File Or Firmware
- Overview

Protected Setup Pages
74
MVP-9000i Modero® Wireless Touch Panel with Intercom
Features on the second page of this tab include:
FIG. 68 System Settings - WiFi Tab (page 2)
System Settings - WiFi Tab - Page 2
Back: Saves all changes and returns to the previous page.
WiFi/Wired icon: The icon to the left of the Connection Status Icon displays whether the current
connection to the Master is Wireless (image of a radio antenna) or Wired (image
of three networked computers).
Connection Status icon: The icon in the upper-right corner of each Protected Setup page provides a con-
stant visual indication of current connection status.
Note: a Lock appears on the icon if the panel is connected to a secured NetLinx
Master.
SSID: Displays the currently used SSID of the target AP.
Mode: Displays the currently selected security mode within the Simple or Enterprise
security modes. This may be changed within the Simple or Enterprise Security
mode popup windows (for more information, please refer to the Security
Modes section on page 76).
Security Type: Displays the currently selected Security Mode: Simple or Enterprise.
AP MAC: This unique address identifies the Access Point (AP) used by this panel for
wireless communication (read-only).
Active Roaming: The Active Roaming setting may be changed from Disabled to Enabled for
802.11b/g (1,6,11) or Enabled for 802.11a. When enabled, this allows roaming
between channels 1, 6, and 11 in the "b/g" band or all available channels in the
"a" band, depending on the Regulatory Domain.
Channel: The RF channel being used for connection to the AP (read -only).
Signal Level Value: This indicator displays a description of the signal strength of the Access Point
signal.
Signal Level: Provides a graphical representation of the Signal Level Value.
Prev. Touch this button to return to the first page of the WiFi tab.
Site Survey: Touching this button launches the Wireless Site Survey page. The options on
this page allow you to detect (“sniff-out”) all APs transmitting within range of the
panel’s WiFi card.
Security Modes: Security for WiFi connections is available in Simple Mode or Enterprise Mode.
Touch the appropriate button to open the pop-up window for each mode.