
User's Manual
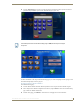


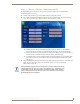


Table Of Contents
- MVP-9000i 9" Modero® ViewPoint® Touch Panel with Intercom
- Introduction
- Accessories
- Configuring Communication
- Overview
- IR Communication
- Modero Setup and System Settings
- Wireless Settings - Wireless Access Overview
- Configuring Wireless Network Access
- Step 1: Configure the Device’s WiFi Settings
- Step 2: Configure the Card’s Wireless Security Settings
- Step 3: Choose a Master Connection Mode
- Ethernet Over USB
- Using G4 Web Control to Interact with a G4 Panel
- Using the NetLinx Master To Control the G4 Panel
- Setup Pages
- Protected Setup Pages
- Upgrading Firmware
- Programming
- Overview
- Animated Transitions
- Touch Gesture Recognition
- Page Commands
- Programming Numbers
- "^" Button Commands
- Text Effects Names
- Button Query Commands
- Panel Runtime Operations
- Input Commands
- Embedded codes
- Panel Setup Commands
- Dynamic Image Commands
- Intercom Commands
- SIP Commands
- ^PHN- AUTOANSWER
- ^PHN-CALL
- ^PHN-DECLINE
- ^PHN-INCOMING
- ^PHN- LINESTATE
- ^PHN- MSGWAITING
- ^PHN-PRIVACY
- ^PHN-REDIAL
- ^PHN- TRANSFERRED
- ^PHN-ANSWER
- ^PHN- AUTOANSWER
- ?PHN- AUTOANSWER
- ^PHN-CALL
- ^PHN-DTMF
- ^PHN-HANGUP
- ^PHN-HOLD
- ?PHN- LINESTATE
- ^PHN-PRIVACY
- ?PHN-PRIVACY
- ^PHN-REDIAL
- ^PHN- TRANSFER
- ^PHN-SETUP- DOMAIN
- ^PHN-SETUP- ENABLE
- ^PHN-SETUP- PASSWORD
- ^PHN-SETUP- PORT
- ^PHN-SETUP- PROXYADDR
- ^PHN-SETUP- STUNADDR
- ^PHN-SETUP- USERNAME
- Battery Life and Replacement
- Appendix A: Text Formatting
- Appendix B: Wireless Technology
- Appendix C: Troubleshooting
- Overview
- Panel Doesn’t Respond To Touches
- Battery Will Not Hold Or Take A Charge
- MVP-9000i Isn’t Appearing In The Online Tree Tab
- MVP Can’t Obtain a DHCP Address
- My AP Doesn’t Seem To Be Working
- NetLinx Studio Only Detects One Of My Connected Masters
- Can’t Connect To a NetLinx Master
- Only One Modero Panel In My System Shows Up
- Panel Behaves Strangely After Downloading A Panel File Or Firmware
- Overview

Configuring Communication
33
MVP-9000i Modero® Wireless Touch Panel with Intercom
Step 3: Choose a Master Connection Mode
The MVP-9000i requires a decision on the type of connection to be made between it and the Master.
To establish a Master connection:
1. From the System Settings page, select the Master tab if it is not already selected.
2. The Current Connection field displays the current connection availability (FIG. 29). If this field reads
“Any”, then connections may be made via Ethernet, wireless Ethernet, or USB.
A Wired connection involves communication from the panel to a Master via a wired Ethernet
connection to the network. This is available through the Wired tab on the System Settings page.
A WiFi connection involves communication from the panel to a Master via a wireless connection to
the network. This is available through the WiFi tab on the System Settings page.
A USB connection is a direct connection from the panel’s mini-USB port to a corresponding USB
port on the PC (acting as a Virtual Master). This is available through the USB tab on the System
Settings page.
3. Select the Mode field to choose the master connection mode. The connection modes are Auto, URL, and
Listen. For more information on the Connection Modes, please refer to the System Settings -
Master section on page 70.
FIG. 29
System Settings page - Master Tab
Although firmware upgrades can be conducted over a wireless Ethernet connection,
transferring firmware KIT files over a wired LAN, USB data stick, or USB flash card is
recommended, and only when the panel is connected to a power supply. If battery
power is below 30 percent, and the touch panel is not connected to a power supply,
the download will not be completed.