
User's Manual
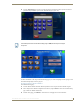
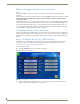
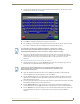
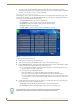


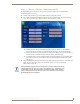


Table Of Contents
- MVP-9000i 9" Modero® ViewPoint® Touch Panel with Intercom
- Introduction
- Accessories
- Configuring Communication
- Overview
- IR Communication
- Modero Setup and System Settings
- Wireless Settings - Wireless Access Overview
- Configuring Wireless Network Access
- Step 1: Configure the Device’s WiFi Settings
- Step 2: Configure the Card’s Wireless Security Settings
- Step 3: Choose a Master Connection Mode
- Ethernet Over USB
- Using G4 Web Control to Interact with a G4 Panel
- Using the NetLinx Master To Control the G4 Panel
- Setup Pages
- Protected Setup Pages
- Upgrading Firmware
- Programming
- Overview
- Animated Transitions
- Touch Gesture Recognition
- Page Commands
- Programming Numbers
- "^" Button Commands
- Text Effects Names
- Button Query Commands
- Panel Runtime Operations
- Input Commands
- Embedded codes
- Panel Setup Commands
- Dynamic Image Commands
- Intercom Commands
- SIP Commands
- ^PHN- AUTOANSWER
- ^PHN-CALL
- ^PHN-DECLINE
- ^PHN-INCOMING
- ^PHN- LINESTATE
- ^PHN- MSGWAITING
- ^PHN-PRIVACY
- ^PHN-REDIAL
- ^PHN- TRANSFERRED
- ^PHN-ANSWER
- ^PHN- AUTOANSWER
- ?PHN- AUTOANSWER
- ^PHN-CALL
- ^PHN-DTMF
- ^PHN-HANGUP
- ^PHN-HOLD
- ?PHN- LINESTATE
- ^PHN-PRIVACY
- ?PHN-PRIVACY
- ^PHN-REDIAL
- ^PHN- TRANSFER
- ^PHN-SETUP- DOMAIN
- ^PHN-SETUP- ENABLE
- ^PHN-SETUP- PASSWORD
- ^PHN-SETUP- PORT
- ^PHN-SETUP- PROXYADDR
- ^PHN-SETUP- STUNADDR
- ^PHN-SETUP- USERNAME
- Battery Life and Replacement
- Appendix A: Text Formatting
- Appendix B: Wireless Technology
- Appendix C: Troubleshooting
- Overview
- Panel Doesn’t Respond To Touches
- Battery Will Not Hold Or Take A Charge
- MVP-9000i Isn’t Appearing In The Online Tree Tab
- MVP Can’t Obtain a DHCP Address
- My AP Doesn’t Seem To Be Working
- NetLinx Studio Only Detects One Of My Connected Masters
- Can’t Connect To a NetLinx Master
- Only One Modero Panel In My System Shows Up
- Panel Behaves Strangely After Downloading A Panel File Or Firmware
- Overview

Configuring Communication
32
MVP-9000i Modero® Wireless Touch Panel with Intercom
Step 2: Configure the Card’s Wireless Security Settings
The second step in setting up the wireless card is to configure the Wireless Settings section of the WiFi Settings
tab. This section configures both the communication and security parameters from the internal wireless card to
an access point (AP). The procedures outlined within the following sections for an 802.11a/b/g card
facilitate a common security configuration to a target access point.
Refer to the Appendix B: Wireless Technology section on page 197 for more information on other security
methods.
After setting up the wireless card parameters, configure the communication parameters for the target Master;
see Step 3: Choose a Master Connection Mode section on page 33.
Configuring the Device’s Wireless Card for Secured access to a WPA-PSK-Secured
AP
In the System Settings page:
1. Select the WiFi tab.
2. Press the Next button to move to the second WiFi tab page.
3. Enter the SSID information by:
Automatically filling it by pressing the Site Survey button. From the Site Survey page, choosing an
AP from within the Site Survey page and then pressing the Connect button at the bottom of the
page (FIG. 26).
Manually entering the SSID information into the appropriate fields by following steps 7 through 9.
4. From the two Security Mode selections, press the Simple button to open the Wireless Security: Simple
Mode popup window. Press the Security Type field to select WPA-PSK.
5. Press the red SSID field to display an on-screen Network Name (SSID) keyboard.
6. In this keyboard, enter the SSID name of the access point (case sensitive).
7. Click OK when complete or Abort to return to the popup window without saving any changes.
8. Enter the pre-configured WPA-PSK password.
9. From the Wireless Security: Simple Mode popup window (FIG. 27), press the Save button to incorporate
the new information into the device and begin the communication process.
10. Verify the proper configuration in the fields in the WiFi tab. Refer to Step 1: Configure the Device’s WiFi
Settings section on page 28 for detailed information.
11. Press the Back button twice to return to the Status page. Remember that the connection must be
configured to a target Master from the System Settings page.
12. Monitor the WiFi Settings tab to verify that the IP address was obtained. This is confirmation of a
successful connection to the AP.
The selected AP should be preconfigured with an WPA-PSK password.
The signal level field should provide some value indicating the strength of the signal
from the Access Point. If no signal or no IP Address is displayed, configuration of the
network may be required.